Monday, December 29, 2008

Business cards as a photography marketing tool!


Not too long ago I mentioned a great idea that had been handed down to me from a couple of different sources. The idea that filtered down to me is to make up business cards using your client’s favorite image from their photo shoot and then include them with their order at no cost to them. The deal is that you put your best two or three images on the back of the cards with your information for all to see.


That is great as it places my information, as well as a few samples of my work, directly in the hands of potential clients. The client is happy, the potential client is happy, and I am happy.


This particular client is also a friend of mine and I know that they will be very happy to give these cards out to potential clients for us both. They are rather pleased with their images that I took of their family.


We (the photographers) must absorb the cost of the cards out of your mark up from the order, but what is the price that you’d pay for some awesome marketing? The cards I purchased were cheap enough, and I had them made through the same online lab that prints my images. They are also easy enough to design and then upload for printing.


To make the cards up I had to first download a Photoshop template from the online labs’ website. The template makes making the cards a snap! With the template open I simply added a fast change of background color, and then the images were added with a quick drag and drop using layers. Text was typed on to them just as easily too! Before I knew it the cards were done and uploaded!

Sunday, December 21, 2008

Light modifiers for flash heads.


With the current state of affairs of the economy, we would all be wise to make all of the devices that we can, and only purchase what we can not. I have made several of my own light modifying devices, and they work just as well as the ones that can be purchased. Like I have said before; I would think twice about pulling home made devices out on a paying gig, like a wedding. I do not have an ego or too much pride; I just think that cardboard light modifiers might put doubt of my abilities in the hearts of the wedding party. The few light modifying devices that I own and use work great. I have tried to spend as little money as possible while I try to get better at using these devices. Maybe as I get better I will opt for more expensive modifiers, as future pay checks allow. The point is that I did not want to spend cash on something that I may not use more than once or twice.
I would like to start this off with a toast to the person that invented Velcro. I have wrapped each of my flash heads in Velcro, and I suggest that you do the same. I opted for a couple of rolls of this awesome stuff, and I cut it as I need it. Sometimes manufactures get a little skimpy when it comes time to supply the consumer with a Velcro stash, and I understand why, because I would too!

All of these devices that I own are held onto the flash heads with Velcro, with the exception of my home made snoots. I made them snug enough to slip over the front of the flash and hold tight. The types of devices that I use most often are diffusers (soft boxes, umbrellas, and tissue paper), snoots (with and without grids), gels, bounces, and those bare bulb omni thingies that come with Nikon flash heads. The image shows my little collection, and I will quickly detail them, and then detail the ones that are on my wish list.
I started out purchasing light modifiers. I now realize that this is not rocket science. In no time I found myself building the parts and pieces that I wanted next, and others that I could not find for sale.

My first light modifying purchase was a Lumiquest mini soft box diffuser, the LumiQuest SoftBox III LQ-119. I use it on a flash head, mounted on my camera, and aimed directly at the subject. It folds flat, adheres with Velcro, and it has a portion of its surface double thick where the flash is the most intense. Simple, elegant and easy.


Next, I found that I had a need for a bounce.LumiQuest 80-20 bounce Weddings were at the bottom of this need. With the flash on the camera and aimed directly ahead, I noticed a problem. The client was being washed in flash while the area around the clients was rather dark. The shadows were also way too intense I thought. To solve this trouble, I found a great Lumiquest bounce, the “80-20”, or LumiQuest 80-20 bounce. They Velcro onto the flash heads, and fold flat when not in use. These particular styles of bouncers come in different types, or numbers as a name. Let me explain what this name means.


The flash head needs to be aimed straight upwards when you use a bounce like this, the LumiQuest 80-20 bounce. These units are designed to bounce only a portion of the flash forward at the subject and the rest goes straight through the device. The title “80-20” means that 80 percent of the flash goes straight up through this device to be bounced off of the ceiling. The “20” represents the remaining 20 percent of the flash that gets re-directed (bounced) towards the subject. This allows for both a nice bounced lighting for the removal of any harsh shadows, and a nice boost of light on the subject.
Now, for my first “all for play” toy that I purchased, just to make some cooler images. The LumiQuest Snoot (pictured) also attaches with Velcro, and folds flat when not in use. It also has a seam running down its entire length that is held with Velcro. It has a white interior, for bouncing the light, and a black vinyl outside that matches my photography gear. I like the LumiQuest Snoot a lot.

Once I ripped the LumiQuest Snoot open and laid it flat, it occurred to me that it would be easy to make my own snoots out of good ole cardboard. I placed one of my flash heads onto a piece of cardboard one night, and before I knew it I had made a couple of square snoots. I have also recently heard about adding scrims inside of these snoots, made entirely out of straws, on a blog somewhere. These will keep the flash light from scattering, and will keep it tight instead. I have made a set out of regular straws that I cut into about one and a half inch lengths. Well, it aint pretty, but it works quite well!

I also use a lot of colored gels with my flash gear. I like having the option of adding a splash of color to my images. The only two ideas that I have to share here are cutting your own gels out, or just get them for free. Basic lighting gels (of the primary and secondary colors) are sold cheap, but they come in sheets of 8x10 inches. The colors are few in number, but one sheet makes a ton of gels for our small flash heads.
Rosco makes particular gels just for flash photography. They make gels that help out with white balance issues when shooting in all types of lighting conditions. To see where to get a Rosco gel sample kit for free, go to http://cameradojo.com/2008/05/04/honlphoto-rosco-gel-kit-released/ and check out what they have to say first, and then get yourself your own free Rosco gel sample kit. They are just the perfect size for these smaller flash head units.

Now here comes my wish list... I have heard that the good folks at Strobist (see a link for Strobist on your right hand side of this page) have recently come out with barn doors for the smaller Nikon and/or Canon flash head units. These sure would make it easy to gobo out the light that I do not want to show up on surfaces like walls and backgrounds. I am using a section of cardboard now so anything even resembling barn doors would be very welcome.

Next on my wish list are the Westcott brand "Mini Apollo soft box kits" for flash head units (see link) http://www.fjwestcott.com/details.cfm?id=201&tbl=lightmods . These come with an attachment for mounting your flash and wireless triggering system, as well as the soft box itself. They are also now making grids and other neat toys for these tiny soft boxes.

As I look into the future I can see that I will have a need for upgrading to the pocket wizard brand of wireless triggers. These have a much longer range and they are a lot more reliable too. I like the ones that I have now, but quality and reliability are the issue.
Well, till next time.... Happy Holidays to you all!!!

Thanks, as always, for reading All Things About Photography, and I hope you have enjoyed it!

Wednesday, December 10, 2008

Dave Hill Rage

Recently I have been seeing a ton of blogs out there that deal with the topic of cool editing tricks.

The “it look” for the times is, without a doubt, the "Dave Hill look” using the Dave Hill technique. Save the link to your favorites so that you can return to it as you learn it and can apply it from memory.

Here is my first attempt at it.

Lots of blogs have been hosting other folks images “all done up” using this cool look. To see what others have been working on, look on Google, under “Dave Hill Technique”, and also look here.
This is a trick that only takes a minute to apply. It could be used as an action in Photoshop except for the eye layer removal part. One can learn this, and get quite good at applying their own version of this look in only a couple of passes!


Please feel free to send me a link or an email with your shots with the Dave Hill Technique added! I will post a few on this blog, for the world to see!! Enjoy and have fun!!!

Wednesday, December 3, 2008

Glamour shots with a “beauty dish flash” look for pennies!

I shot this "blown-out" style of glamour-like image, using a simple set up that mimics a “beauty ring flash (beauty dish) attachment”, and I set it up in only seconds flat!


I did it using only two Nikon flashes, a piece of seamless paper, and that's all (besides two wireless triggers for the flashes).


If you do not have a light ring,(beauty dish) then this is how you can mimic the look of using one very easily!


First of all I must admit that I saw this photo set up in a book on photography portrait techniques that must have been twenty (plus) years old. I did not purchase the book, nor can I recall the name of it, but this concept was detailed within its pages. I briefly looked at what they had done, and then I made a couple of mental tweaks to their idea. Weeks later the opportunity to use this exact set up made itself available to me.


The beautiful young lady in these images is a good friend of mine, as well as a client. She came to me with a big problem. The problem was that her boyfriend didn’t even have a single image of her. She has just never had any pictures of herself taken for a long, long time and he has been paying the price. I explained that I would love to solve her problem, and we could both have some fun while doing it!


As far as "a look" for the photography session, she was up for anything. She only wanted something “cool and different”. Upon hearing this, I immediately thought of the simple set up that I had recently seen in that old book. Allow me to explain just what I did in order to obtain these great images!

The first thing that I did was to hang a section of white seamless paper from a height of about five feet, and let it hang down to the floor. I put my Nikon D-200 (on a tripod) and placed it on one side of the hanging seamless paper. She would be on the opposite side of the seamless paper that my camera and myself were on.


Next, I cut a hole in the seamless paper at the exact spot that my lens was at, at just the same size as my lens. This hole would be what I would shoot through. It is important that you not stick your lens through the hole in the paper though, but instead keep it on the same side as the camera. This will prevent flash flairs from entering into your lens and ruining your images. The seamless paper should be white too, as to "bounce" white light onto your subjects face.


Next, I sat my friend down on a small chair directly in front of my new hole that I cut in the seamless paper, and only far enough away from the paper for me to focus on her (a couple of feet away).


Then I placed two flash units (with wireless triggers) onto flash stands, and aimed them at the seamless paper, at about a 45 degree angle to the hole. You do not need a wireless trigger system though, instead use what ever means you normally use for triggering off camera flash units. The flash stands were placed about half of the distance of my model (from the seamless paper) and the flash units were at about the height of her face.


I did not use any diffusers or any sort of softeners on the flash units as I wanted a “blown out look”. However, I could have used them as I ended up softening the images later on in Photoshop. Hind sight is 20/20.


The shot needed to have very little in the terms of shadows, but it needed some tone and some definition in her hair and in her facial features, like as in her eyes. The way that I accomplished this was to vary the intensity of the two flash units until I got it right. Keep the settings of the two flash units equal with each other so that no one side of the face gets a shadow. I set the flash units at ¼ power, with the camera set at 200th of a sec, f-20, and an I.S.O. of about 400.


The mental tweak that I made (and ended up using in this series of shots) was to place some nylon lace behind the model/friend on a stretched frame. Then I placed a separate flash unit with a red gel over the unit on the floor and pointed it straight up towards the nylon lace material. This gave an interesting back ground. I did have to use a gobo on the floor flash unit because some of its light leaked into the white seamless paper, and made it onto her face.


Once again, it goes to show you that you can learn something new from an old book. In this case it was an old book that was written and published back in the days of film photography, but it doesn’t matter! Techniques are techniques, rather it be film or digital! Shop the used book stores as often as you shop the new book stores. That way you can learn some cool new things for a lot less.


Have fun, and enjoy!

Wednesday, November 26, 2008

Strobist DVD set


Hey my gang of photo nuts....
I have watched yet another life changing DVD that I just must recommend that you all see. Strobist: Lighting in Layers with David Hobby

David Hobby, the guy behind the curtain at the Strobist blog, has released a DVD set, Strobist: Lighting in Layers with David Hobby, that should be on the top of your must have-must see list.
 It does not matter if you shoot on a freelance basis for papers or stock agencies, or you shoot in a studio setting, you will get better within the first 30 minutes of the first DVD.

In Strobist: Lighting in Layers with David Hobby David starts with a review of all of the gear that he uses, how he uses it, and why he uses it. He then goes into so many tips and tricks that my head is still full. I was in favor of studio flash gear, but no longer take that stand. His brilliant techniques will bring you over to this side as well. He simplifies all aspects of packing, travel, and set up of the gear, and explains in great length how to use it all!


I thought that the basics of wireless flash set ups were something that I knew already, but I was wrong. The theory of flash sync speeds and how to push them to their limits are the most inspiring part of this DVD set. I stopped the Strobist: Lighting in Layers with David Hobby many times in order to grab my Nikon, my flashes, and go try out what I had just learned. My photography has just improved by ten fold, both in portraiture and in product shoots!


Plus, I have always wondered how the folks over at Flash Flavor accomplished some the things that they do, and now I am “in the know”! I can’t wait to apply my new knowledge to the next event that I cover! I love Strobist: Lighting in Layers with David Hobby!

Plus, I learned how to spend a lot less on photo gear, how to set up lighting kits for any location shoot (that I can sling over one shoulder), and also how to set up and shoot incredible images in just seconds flat!

The information that I learned about rechargeable batteries for our flashes in this DVD set all by it self was worth the price of this whole set. Speaking of price, look for yourself at how low the cost actually is! Keep in mind that it is an all day seminar, a photo shoot, plus an extra DVD that explains all of the gear that he recommends.

Once again, you must purchase the Strobist: Lighting in Layers with David Hobby set!

Saturday, November 15, 2008

Fast cool image look.

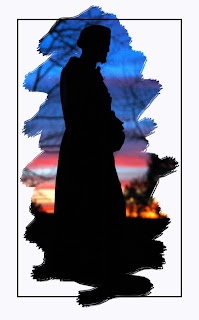
I have always liked to use cool new ways in which to show an image. Photoshop is the tool that has opened the world up to so many new ways of creating these cool looks. I like to play with allot of these different ways to show images, but one of my favorite types is the "erased background" look. Here is an example.
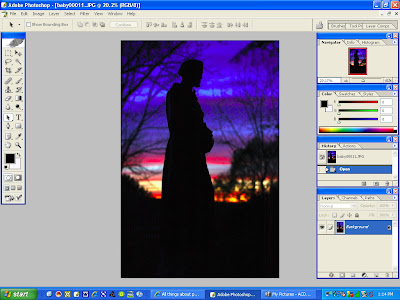
Here is a rather fast way to achieve this effect, and how to apply it to any of your images. Here is the image that I started with. It is of a statue at almost sunset, causing a pleasing silhouette.

I am going to use white as a "fill color" to later erase from, in order to reveal the background image. However, you can choose any color you wish, and add effects to it like a gradient. You can choose an exact color using the eye dropper tool and you can even sample a specific color from your image using this same tool. In this example I will use a solid white.
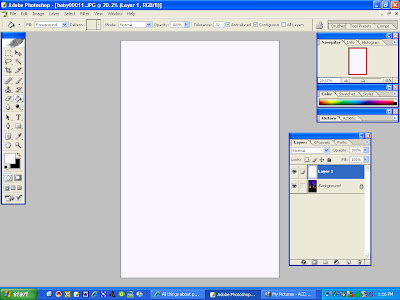
The first step, after you have opened the image in photoshop, is to add a new layer. Do this by clicking on the "new layer" button at the bottom of the layer pallet well.


Next, click on the eye dropper tool icon, and choose any color you wish. With the new layer active, press "alt + backspace" to fill the new layer with your chosen color. You can also use the paint bucket, or "fill" tool to perform this step.

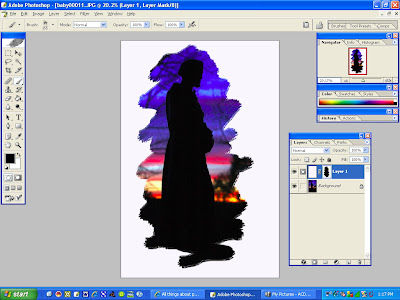
Now, make this layer a layer mask by clicking on the "add layer mask" icon in the layer pallet well. It is the icon that looks like a circle in a square. Next press the letter "D" then "X" to set your active colors to black and white. Choose the paint brush tool, and a spattered type of brush. Make it a large setting on the brush size. Choose black to paint away the white, and white to paint it back into the image.
Next, I went ahead and added another new layer and chose the square select tool, and put a rectangle around the frame of the image. I then looked under "edit" and selected "stroke". Using a black stroke, I set the width to about 7, and chose "center", all in the stroke tool dialogue box. You can next alter the opacity of the stroke to taste while that layer is active. After you have played with it, and you like the way that it looks, flatten the layers. You can do this by looking under the "layers" heading, and choosing "flatten image". Last of all be sure to save your new creation, and use a thoughtful name!

Friday, November 7, 2008

The best PR is done from the heart.

As photographers, it is not always the photography that we are selling. People invest in the photographer as a person just as much as they invest in the photographers skills.
In these times that we all live in, people often see only the bad things that others around us sometimes do. Bad news travels at the speed of light, and without any resistance. Good news takes allot of time to spread, if it ever spreads at all. It can take a life's worth of good deeds to build up before any word of them leaks out to the public. It takes just one negative word to come out of our mouths for people everywhere to hear it and remember it.
Volunteering can seem like a thing that the rich folks or the people with too much time on their hands, do. Fact is, we all can easily volunteer, and we all should. When asked to use our craft or our talents for a volunteered based project, it can help others and ourselves, both in ways we never thought imaginable. We never think about the things that may come from doing a good act, but instead we just do them. But sometimes these acts come back to us. Infact, they often come back many times over.
It is also true that we often know very little about the things that we think we know allot about. As an example I would love to share something that I was fortunate enough to participate in several years ago.
A relative and myself were members of a local camera club when a call for volunteers was put out one night. Basically, a non profit organization named the Bicycle Coalition of Maine was asking for a photographer to volunteer their time and their skills to photograph one of their annual events. The event is named the "Maine Lobster Ride and Roll". That sounded so fun that we spoke up, and decided to go ahead and donate some time to this great cause. Little did we know what lie ahead, or how it would soon help to "place us on the map" as newly turned professional photographers.
Before I continue, let me explain a little about Bicycle Coalition of Maine. The Bicycle Coalition of Maine is a not for profit organization that promotes bicycle safety to students of all ages, to motorists, and even to police officers! The "Maine Lobster Ride and Roll" is an all day bike ride event that raises funds for the coalition. Their are several courses that one can choose to bike, and each one offers a different ride through the coastal towns and lighthouses of mid-coast Maine. The best part is that at the end each participant gets a free Maine Lobster roll! Every year the turn out is growing and growing, and it has become quite the popular event both in the mid-coast area of Maine, and in the entire bicycle community.
We went, we shot, and we had a great time! We learned a lot about the coalition and we also got a chance to meet a ton of new faces. The people that participated in the event were all completely happy and so nice to us that we stayed for the entire day. We photographed the bicyclists as they rode along the coast, rode past lakes, and hung out at the refreshment booths set up along the way. It was all very well put together, and they were happy that we were their to capture it all. We mailed out a CD containing the images, and that made me feel great!
It was not long before I started getting emails from participants of the Maine Lobster Ride, asking for copies of the images that were taken that day. Among the many emails were some great stories like this one: "That was the first event that my daughter and I have ever done in our adult lives and I would love a photograph to remember the time that we shared". With what little time and money it took to get a CD of the images mailed out to these riders, I soon found out that I had made a loyal client. They certainly told others these stories, being sure to include the name of the photographer that helped them get the images from the event. See where this is going?
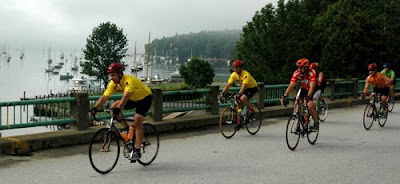
Much to my surprise the Bicycle Coalition of Maine started using our images on their website (with credits) and they also posted links to our photography sites. They continue to use our images (with credits) in all sorts of unique and clever ways, like in posters, mail-out fliers, and even to make greeting cards! I cant imagine how many referrals that all of this has brought my way, but I can tell you that I never imagined that the simple act of volunteering that day would give back as much as it has.
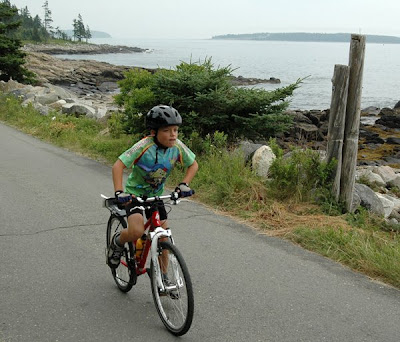
Please check out what the Bicycle Coalition of Maine folks have to say, and see about the Maine Lobster Ride and Roll . It is always with the intentions of doing something nice for others that we donate time and or money. However, when it becomes a win-win situation it makes everyone that was involved or everyone else that hears the story just plain feel good. Many warm "thank you's" go out to the Bicycle Coalition of Maine for all that they have done in the state of Maine and in my life!