Sunday, May 31, 2009

Setting your camera up for HDR images.

Please refer to one of my recent blog posts HERE to learn more about HDR photography. Then, please come back and learn how to set your camera up to take HDR images!

The camera that I will be using as a model in this post is a Nikon D200, but all digital SLR cameras operate pretty much the same, they just put the buttons in different places. Plus, you will need a tripod and a Nikon MC-DC2 Remote Release .

Bracketing explained.
There are many types of bracketing available to us in this; the digital age. With digital cameras come all types of bracketing options. Some of these bracketing options are white balance bracketing, flash bracketing, and exposure bracketing.

Exposure bracketing explained.
Often times dubbed the photographers insurance, exposure bracketing is used most frequently by the press. When a photographer finds him/her self in a fast paced shooting environment he/she needs to make certain to never miss the money shot. This is where bracketing and exposure bracketing come in handy.
Exposure bracketing can be set with either an aperture setting or a shutter speed in the priority. In other words, when used with an auto priority mode, you could set (lets say) the shutter speed (shutter priority mode) that you want to remain constant, and only the aperture opening would fluctuate with each shot.

Exposure bracketing is first set up in the cameras’ menu system, and then it’s turned on for use on the fly. Basically you are entering into the camera exactly how far apart you would like each of the exposures to vary in a series of shots, and how many shots are in this series.

Usually the photographer correctly meters (and adjusts) for the scene, and then snaps a bracketed series of images, all of which are of the same scene. When bracketing, each time the shutter release button is pushed a shot in the series is taken. In a typical series of three exposure-compensated images, one will be perfectly metered, one will be exposed at a pre-determined variable difference in exposure (either above or below) the first one, and then the last image in the three shot series will be exposed at a pre-determined variable in exposure (either above or below the first image) thus ensuring that one of the images will be perfect each time.


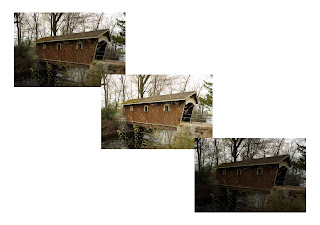
Simply put: three images are recorded, one perfect, one exposed for the shadows, and one exposed for the highlights. If you have a preference for what order the images are taken (from light to dark, dark to light, ect.) than you can program your digital camera to do just that.

Why bracketing for exposure is important in HDR photography.

Exposure bracketing is what we will use in order to take our multiple HDR images quickly. “Quickly” was used here because if the scene in our HDR image changes too fast, the multiple images will appear to be blurred once edited. This explains why most HDR images are of a static scene. Also, if you set the shutter speed (F-stop) to change throughout the bracketed series, the depth of view might change with them. This, again, makes for impossible editing for a crisp HDR image. Set your aperture to vary in your series of shots. I highly recommend using a Nikon MC-DC2 Remote Release when shooting HDR images, in order to avoid camera shake. Use of a tripod is paramount with HDR imagery, and for this very same reason.

I am going to use the “Manual shooting mode” for this HDR imagery tutorial. I most often keep my camera in manual mode, so it will be easier for me to keep it this way. To be more specific, we are going to set our cameras up for exposure bracketing, and we will want only the aperture to change and not the shutter speed. We will select the three image option for our bracketing exposures, and choose a one third of a stop increase and decrease for the series.

We will use exposure bracketing in order to capture three images of the same scene, but each one will have a different exposure. One image will be exposed for the overall scene, one will be exposed for the shadow detail (plus one third of a stop), and one will be exposed for the highlight detail (minus one third of a stop). Later, you will edit these three bracketed images down into one HDR image!

Before you start editing your bracketed images, please jump over to here in order to see several different ways in which to accomplish the editing task at hand. Also, I posted some great links to some great tutorials.

Nikon MC-DC2 Remote Release
Setting the exposure compensation, made easy.
There are only a couple of things that you must keep in mind when setting up the exposure compensation in your camera for an HDR image. First, how many images do you wish to take in your series of the scene, and secondly, how wide of a difference in exposure do you wish to capture?

Too few images taken at the scene may make for a not so dramatic HDR image, while too great of a difference in exposure (stops) may be too difficult to edit. I suggest that you start easy, and as you gain the skills that are involved, then you will know how to better set up for your scene.

With ease in mind, I suggest that you start with a “three-burst” exposure, and at one third of a stop difference as an exposure. You can always alter these settings as you learn what works best for you.

Here is the easiest way to set up your camera for our HDR image, and then turn on exposure compensation once you arrive on the scene.

First, place your camera into manual shooting mode. Press the “Mode” button found on the top of the Nikon D200, and use the commander dial until “M” is shown in the top LCD window. Please see the images posted along with this entry for more detail.

In camera settings for bracketing.
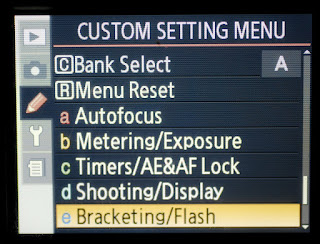
Next is setting up the camera using the menu system. We are about to input the factors into the camera so that when we want to bracket we can simply turn the bracketing on and then shoot away.

Press the menu button, found on the back of the Nikon D200. Scroll down to the pencil icon, and then select setting “E”, which is “Bracketing/Flash”.


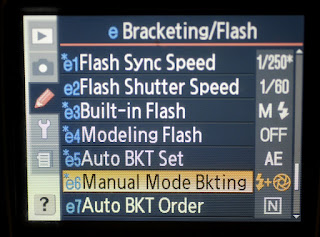
Press the selector pad to the right and scroll down to, and select “E6”, which is “Manual Mode Bracketing”. We don’t want an auto mode bracketing, instead we wish to employ manual. Auto modes use one of the settings that we input, and automatically changes the other setting for a perfect image. This is not what we are looking for.


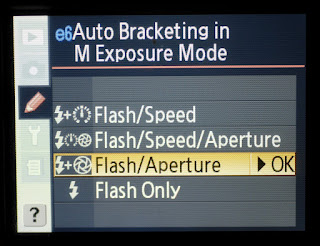
Press the selector to the right once again, and scroll down to, and select, “flash/aperture”. Press to the right once more in order to select “OK”. This step tells the camera that we wish to have the aperture change, and not the shutter speed, each time we shoot an image in our three shot bracketed series.


How to turn on the bracketing once we are on the scene and ready to shoot.
Study the scene. Decide on an I.S.O. setting, an aperture setting, and shutter speed setting that will correctly capture the scene. This should be the correct meter reading, and settings, for the scene that you are about to shoot. Your three shots will consist of this image, one image exposed above this, and one exposed below this.

Next, press the “plus/minus” button found on the top and right side of the D200. Rotate the main command dial to set your exposure compensation amount, in our case .03. This is how much (in stops and fractions of a stop) you desire the exposure to vary from image to image.

Once that is set, press the “BKT” button, which is the Bracket button, found on the back and left hand side of the Nikon D200. Press and hold this button, and perform the following:

Turn the sub-command dial, found on the front right hand side of the D200, until it looks like the image below. The numbers shown in the LCD screen represent the two factors mentioned in the opening of this post. The number on the left of the LCD screen represents the number of images in our bracketing sequence. Setting to the right of this is the amount of exposure compensation. Make sure that this number is set so that the meter bar below shows one shot above perfect exposure, and one shot below perfect exposure.


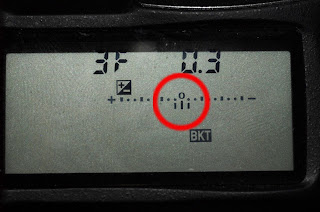
Lastly, turn bracketing on already! With the “BKT” button pressed and held, turn the command dial until you see the bracketing icon appear. It is the “BKT” icon. This toggles the bracketing on and off.

Nikon MC-DC2 Remote Release
Compose the image, and then shoot. You will need to take three images, of course, but you knew that.

Thanks for reading the “All Things about Photography” blog, and feel to subscribe so that you don’t miss a post! As always, your comments are always welcome and posted.

Enjoy making your HDR images!

Monday, May 25, 2009

Light painting links to visit.

Exploring the web the other day, I came across some awesome light painting sites and blogs.
For some great people shots, I like what Light Painting.org has to show. The blog that complements this page can be found here.

Art 6 Now has a Flicker Photo stream that proves that he or she is a master of this technique. Truly amazing work!

A great place to learn about the history of light paintings humble artistic beginnings, visit Dark Roasted Blend. Many popular photographers works can be viewed here, and some are very comical indeed!

For a great video tutorial on how to create your very own light paintings, be sure to stop by one of my favorite sites, Digital Photography School. This is a wonderful resource, with tons of great information.

Thanks for visiting, and please be sure to subscribe as you don’t want to miss out! Please feel free to comment as well, as your thoughts mean a lot to me.

Tuesday, May 19, 2009

Six simple ways to improve your digital images.

Here are six easy ways to become better at taking digital images, and to ensure years of enjoyment from your gear.

1) Take a local adult education class dealing with digital photography. Learning how cameras work might seem to be below you, with full auto cameras, but that is where you should start. You wouldn’t attempt to star in a film if you hadn’t first taken an acting class, would you? You can pick up all of the digital “lingo” basics, a ton of new tips that you might not have ever learned, and all from a simple nights or weekend class. Spend time picking the instructors brain, and ask all of the questions that you might have. Get your moneys worth!

2) Set aside an hour or so each day and surf the web for digital shooting and digital software editing tutorials and podcasts. With what free time I can find I try to watch a lot of tutorials. Some of the best tutorials are only a minute or two in length, and they can be directed right into your ITunes account so that you never miss a trick. Here are some to get you started in the right direction.

Simple photo life
D-town TV
Scott Kelbys Photoshop insider
Simple photo minute

3) Go to popular photographers’ sites and follow what they teach. If I wanted to learn about something I would ask a pro. Why risk getting bogus information? Here are some of the best sites that I have come across, when dealing with pro’s that share.

Moose Peterson
Strobist
Squeeze the lime
Alt F
Flash Flavor
Weekly photo tips

4) Purchasing a few simple items of gear and learning when and how to use them can pay off big time. Try out some items designed to make your photography experience easier and more enjoyable like using the correct tripods, filters, software, and lenses for whatever type of images you are shooting. If you can’t find the resources to splurge on expensive items that you feel you are not ready for, consulting the D.I.Y. sites listed below can help you get closer to your ideas!

DIY Photography
Digital Photography School
DIY Photography .net

Learning what certain gear does can improve your understanding of what is achievable. I often ask “How did they do that”, and later figure it out as I read about a new piece of gear that has been released. Anything is possible if you have the right gear, or is it tools?

5) Organizing your gear can save you both time and trouble in the long run. Look into finding the best (safest) camera bag for your shooting environment. Keep your camera bag clean by using a vacuum with a narrow attachment. This will keep dirt and scratches at bay.

Place your expensive memory cards all in one (safe) place using memory card wallets. Flipping the full cards with the label side facing in an opposite direction will quickly let you know which ones to use next. Always format your used memory cards before shooting with them again. Simply deleting the images is not good enough, and it is too time consuming.

6) Protect your investments by obtaining this gear listed below, as they are easy ways to prevent failure in the future.
Camera armor
lens pouches
camera bags
(Image sensor) cleaning kits
(memory) card wallets

Feel free to subscribe, and comments are always welcome!

Wednesday, May 13, 2009

Getting the most out of a week.

Like most bloggers and digital photography geeks, extra time is hard to find. It seems that every time I feel as if I know something about the world of digital image editing, something new comes along with its learning curve attached.

From the outside, looking in, it appears that I often stay home and do very little. However, most of you digital photographers and bloggers know that this is only partly true. While I am at home, I am usually engrossed in online photography tutorials, watching the latest “How to” DVDs, editing a mountain of images, or catching up on the universe that is the blogsphere. This is how I remain a cutting edge kind of guy; well at least that is what I tell myself.

So just how much can a “stay at home, blog crazed photographer” get accomplished in just one week anyway? I try to make the best out of most situations that I find myself getting into. Here is a week in the life.

I am taking images of a friend’s child every 30 days, for her first year of life. A fun “bath time” shoot gave me some fresh new images to edit. With each new photo session comes the possibility of some fresh stock images, and this session was no exception. I downloaded the model releases found on ISTOCK and DREAMSTIME to simplify the upload process, for the first time, and then began uploading a trillion images.


Next, and before I could finish the edit and upload process, a trip up to see my girlfriend (yes, I used the term “girlfriend” if you are reading this) was in store. I decided to visit with my family while in Northern Maine, since I seldom get the chance. My Niece has the cutest little girl (my Great Niece) and a photo shoot was in the works. What a great time I had while in the custody of such warm and fun folks. Once again, I could smell a stock opportunity arising from the fun images that I took.


Since returning to my castle, it is only now that I am free to blog about how swamped I am. I am slowly editing through the images that are back logged, key wording stock images till my death, and all the while missing on my girlfriend. I am under paid and under appreciated, a fact that all “stay at home, blog crazed photographers” are well aware of.

Please feel free to add your comments to my blog post, and subscribe today if you have not yet done so. You do not want to miss out! Thanks and see you soon, here at “A.T.A.P.”.

Thursday, May 7, 2009

Recent shoot with a baby.

Just thought I would post for the weekend, a recent shoot I had this week.


Thanks for looking, and feel free to subscribe. Next post on how these shots were made.


Feel free to view my Flickr stream here!

Friday, May 1, 2009

Creating HDR images.

Today I tried my hand at taking and creating my first ever HDR images.

What is an HDR image, and how does one take and create them?

These are great questions. HDR stands for High Dynamic Range. A HDR image is an image that one creates to show for both the detail in the shadows and the highlights. A normal image is either set to expose for one or the other, so an HDR image can be very impressive to see.

How to make your own HDR images.

HDR images are created by combining two or more images that are captured with a resulting HDR image in mind, using software to merge them. The images must be taken in a certain fashion, and the same is true for the editing procedure.

What gear should you use?

Creating your own HDR image is simple, once you understand what you are after. What I mean is that once you understand that you need three images to combine (an image that is exposed for the highlights, one for the shadows, and one overall proper exposure) in order to get one HDR image, you will be further along. These images need to be as close to the same point of reference as possible, so use a tripod. Try to choose a subject that does not move, or make sure that the wind is not blowing things around too much. Any sort of movement will show up as you begin to merge these images.

Secondly, if you have a remote shutter release, now is the time to use it. If you don’t have one, try using the self timer in your camera. The idea here is to get as little camera shake as you possibly can.

Bracketing for exposure.

Next you will need a way to quickly obtain three different exposure values of the same image. The easiest way to do this is by using bracketing. Bracketing is commonly known as “photographers insurance” because some pros use it to make sure that they never miss a shot exposure. Dig out your cameras manual and get bracketing turned on.

The bracketing that you will want to use is “Exposure Bracketing”. Other types of bracketing are white balance bracketing and flash bracketing. Neither of these applies to our quest for an HDR image, so forget about those for now. With your exposure bracketing it is paramount that you make sure that the shutter speed is what changes, and not the aperture. You do not want three images, each with different depth of view in them. I found that a bracketing of 1 stop works fine but you will want to play around some. Read the other tutorials (below) that I supply links to as they discuss some great bracketing procedures more in depth. Bottom line is to use bracketing to get three different images with the same depth of view. I found that putting the camera in manual mode and changing the shutter speed settings myself (as I shot) took too long and supplied way too much unwanted camera shake.

Tutorials time.

I have tried out several different online tutorials in order to obtain several different looking HDR images, all of which are from the same three RAW/NEF files. These three images will become jpegs and will be used to create three HDR images. I just did three different methods. Here are the three images that I am going to use to create my first ever HDR images.

Then it was time to edit.

I found several promising online tutorials for creating HDR images to choose from, and each one that I have listed (in order) seemed to take an increasing amount of skill. I love the fact that Photoshop allows so many different ways to get to the same place. Try them all, and see which one works best for you. You might find that certain methods work better or worse than others for the images that you are trying to convert.

This first HDR image was made using the tutorial found on this site. It seemed to be the most basic and the easiest Photoshop CS2 HDR tutorial out of the bunch that I tried out. However this HDR image seems to lack a lot of the elements that I was trying to achieve.


The second HDR image merging tutorial that I used can be found here. This seemed to be a little bit more precise, and allowed for better control as it employs layer masks in the process. I like this fact because layer masks give us better control of where to edit and to what degree to edit it. If you ask me, the results are far superior when compared to the first tutorial, but it took twice as long to execute. Plus, it demands a better understanding of working with layer masks.


The third tutorial that I used can be found here. There are three choices of editing for an HDR image on this site, and I went with the second. Once again it employs the use of layer masks. However this certain tutorial was like none other that I had read up to this point. This tutorial is very creative, and comes with some great shortcut keystrokes included. It also uses only the lightest image and the darkest image of the three that you may have shot.


Please take the second that it takes and subscribe to "All Things About Photography" now so you never miss another great post! Feel free to comment, as always, and have fun creating your own HDR images!