 Best wishes for the future!
Thanks for a great time too!
I was recently asked to photograph a friends Corvette. I invisioned trying to pull off what I had seen done over at Strobist, where I had watched this video at You Tube. Looked easy enough, so off we all went to a dark and empty lot.

Taking specific images, of the front, side, and interior for each “pose”, I then layred them up in Photoshop. Added a reflection to some, and then made the Three view image below. Thanks Strobist!!!


Think about making the biggest possible final sale before you even shoot!
Recently, I found myself returning to my old haunt of DownEast Maine. I was there (both) attending and shooting a wedding in the warm spring sun. The weather could not have been better, the family could not have been more welcoming. Everything was great. Shooting in the direct sun was a bit troubling, but not impossible.
The point of todays post is that I remembered some great advice as I drove five hours to the wedding. This advice is that we should shoot as if we are trying to make (and sell) the biggest package possible. Portraits are a no-brainer, but what about mail out cards, thank you mailings, wedding albums, ect? Thinking about what you need to make the most possible items is the way that I treat every event that I now photograph.
The only images that we can't sell are the ones that we don't take.
 This means paying attention to even the smallest of details, as they will come in handy as backgrounds in albums. Albums that you can now make for the family, and eventualy sell. These details become “faded page overlays”, and run throughout albums and mailings as themes.
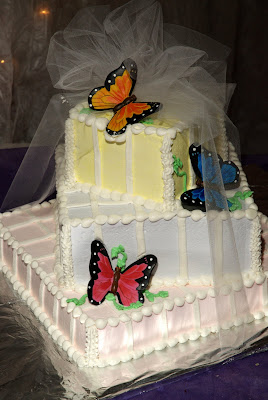
 Here are some details from this wedding. I am posting these images mostly because they are at every wedding, and observing them will pay off. Plus I just loved the “Dead head” grooms cake.
Lastnight, I was invited to observe the night sky with a new friend of mine named Wayne. I jumped at the chance, as I love all things photography. Little did I know just how mind blowing this night would be. Please take a moment and check out his site, HERE, and look at his awesome images before returning back here.
Wayne had informed me about his “cameras" before. These cameras are unlike anything that I have ever come across. They do not look like cameras at all. These computer operated sensors attach to his giant telescope, and record, over time, what the telescope is pointed at. Long exposures are requried most of the time due to faint light sources of objects very far away. This requires that his telescope “track” the object that is being photographed. This is done, via more computers and a vast knowledge base of both the night sky, and the operating systems of the necessary equipment. Lucky for us Wayne has both.
The digital “super cameras” that are designed to image the night sky through a telescope require cooling systems, capture images in black and white, and come with a steep learning curve. Wayne shoots his images in a series of many. By using different colored filters (red, blue, and green) he gets “color” images. Let me just say that one must really want to take amazing images to go through all of this work.
However, these super digital cameras were not the evenings “event cameras”, as Wayne decided to go with a new Nikon digital SLR for taking long exposure images through his gigantic telescope. This was the first time that Wayne would be attaching his Nikon digital SLR to his telescope, and we were curious about how they might turn out. Would this set up even work? How would the focusing work, and what settings should one even use for this image process? Great questions, simple method for finding out the answers. We would try, and see what we get.

How is this? This image of the Orion Nebula was one of the evenings first images. Not bad, eh? Way to go Wayne!
The above image was at iso 200, taken for about 3 or 4 minutes, with the telescope locked on (or tracking) the nebula.
The night was spent looking back in time, through his telescope, and looking at objects that I never though I would see with mine own eyes. I saw Saturn through the telescope, so good infact that it looked like a fake cut out. The rings were visable as was the shaddow of the rings on the planet itself. We saw some of Saturns moons as well, and I enjoyed this paticular evening like none other.
A very large thanks goes out to Wayne for inviting me and working feverishly through the night so that I could see the sky. I am so thankful, and I will be forever anxious to return.

Although his lenses are a lot larger than most, local photographer of the universe Wayne Karuth sent me some of his amazing images of the moon. Wayne enjoys imaging things that most of us will never even see in our lifetime.
 Follow this link over to his awesome site to see some more of his amazing work. Great job!
Digital cameras can be awesome when used as a professional tool. However, as an artistic tool they can leave us unhappy.
Point is that with long exposures digital cameras can contaminate our images with noise and such artifacts, and the batteries do not last as long as we wish they would.
With that said, here is another image that I took while in Arizona. The star trails stop short due to battery life, but what can we do.


This image was taken just after sunset, as a long exposure. I “painted in” this cactus using a flashlight. The light had a “gridded snoot” on it as well, just to make sure that two things did not happen. The first thing is that I didn't want to expose the ground, and second, I didn't want to expose the flashlight tip in the image.
More images and information about how I got them to come soon!
As digital photographers, we have all gone through the learning curves associated with our gear and the software. I often times try to use this knowledge for new and interesting ideas. One such idea is to re-touch older images, using Photoshop.
I like to actually take an image of the photograph that needs re-touching, at the beginning of the project. This is better than most scans that I could make because the raw file from the camera will be massive in size. Make sure to pay attention to the white balance to ensure color correction is as perfect as you can get it. I like to use two flashes set at 45 degree angles to the print, by the way.
Next, make the time to select and then try out the right tools for the edits you need to make. For example, cloning (with the clone tool) may work for some details, but not others.
Re-creating any the lost detail is the hardest part of the process. I like to lean on my art background as much as possible, just to make sure that all of the little things look right.
Before...
 After...
 Next, I placed a red Honl gel onto a Nikon SB28 flash, placed it behind the cut out, and then dialed it in.
Lastly, I lit the child with two other Nikon SB28 flashes, one high and to the left in a small softbox, and one low and to the left with a grid and snoot on it.
