Thursday, April 30, 2009

Front curtain sync fun.

The other day boredom got the best of me. I have been thinking of a fun photo set up for about a week now, and the time had come to set it up. I wanted to play with the Front Curtain Sync option so that I could use the flash and yet still get some “shutter hang time”. I had an idea for a fun shoot, and then one day the way to set it all up just came to me.

But first, what is front curtain sync?


Front curtain sync is a shooting mode that you can choose to use in order to obtain some more creative images. It is commonly known as “flash and burn”, and that actually describes it better. To use the adage “in a nutshell” to explain front curtain sync, it would go something like this; as the shutter is released the flash fires and then the shutter remains open in order to “burn in” the rest of the image. The shutter opens, and captures the part of the image covered by the flash, but the rest of the image needs more time to develop. Nutshell closed.

There is both a front, and rear curtain sync. By simply reversing the time that the flash fires (either at the opening or the closing of a long shutter opening) the name is given.
I like to play with front and rear curtain syncs and I try to get more and more creative. We have all seen the images of a train going by with the flash firing in one of these modes. Most camera manuals proudly show such images in their pages, and I suppose that these images are helpful, but boring.

Setting it up.

I had some time to “flash and burn away”, so I took it step by step. I made only one or two mistakes which I will share with you all. I started by securing a tripod on the passenger side floor of my car. I ended up using a seat belt, some Bogen Super Clamps, and a stiff flexible arm; all in unison, to lock down my tripod.

I added my Nikon D-200 to the tripod, and attached a MC-30 in order to fire the camera from the driver’s seat, while driving. Next I used another Bogen Super Clamp in order to attach a single Nikon SB-28 to one of the tripods legs. This flash was fired wirelessly, all though that probably wasn’t necessary at all since it was so close to the camera body. I only intended to light up my head with the flash, so I added a gridded snoot to the flash in order to better contain the light spillage.


Camera settings.

I placed the camera in auto focus, but I later found out that I had made a mistake. I failed to set the spot of focus to the spot that my head would soon be. I think that the focus was on my driver’s side door, but that’s how we all learn, right? I could set the focus as I drove along by pressing the MC-30 down about half way. Once it was focused I could time the shutter release to expose the image as I passed by interesting background lights.

In order to get the camera into Front Curtain Sync mode, I turned the cameras shooting mode to Manual. Well, it is always on manual mode, but for sake of this post let’s just say that I did this step.

Next, I dialed down the shutter speed to taste, testing the time that the shutter remained open, and stuck with a speed of 2.5, an aperture of F5, and an I.S.O. of 100. An I.S.O. of 100 would allow for very low noise with the long shutter speed that I was using.

I set the flash settings to front curtain sync, which is found on page 78 of the D-200s’ manual. The second mistake was possibly made right here. I can not be sure that I had to do this step because it is for the built in camera flash. It seemed to work fine both ways, but it made me feel better so I did it. If you decide to join me in this step, simply press and hold the flash setting button (lightning bolt) found on the camera body, and turn the aperture dial until the front curtain sync until the front curtain sync is displayed. Once again, it didn’t seem to make a difference, and I feel this step can be avoided completely.


I set the SB-28 flash on manual mode, I.S.O. 100, and at 1/16 power. After several test shots it was aimed and I was ready to roll. Please, do not flash yourself as you drive your car. I was driving very slowly, and most often in empty parking lots. I did see some interest in what I was doing, and I halted my operation as the police drove past me. I’m just saying…….

I would really love to hear your stories and your comments. Feel free to subscribe to the “All Things about Photography blog” now, as you may just miss the next great post.

Questions are always answered, and please be careful if you try this set up.

Monday, April 27, 2009

Midsouth Photographic Specialties Sticky Filters


I love great products that come from good companies. Whenever a company solves a common problem with a product, my interest level spikes. MPS Sticky Filters

I also love companies that stand behind their products and offer great customer satisfaction. I have found these qualities in a company and a cool new product, and I feel a need to pass it on. The Midsouth Photographic Specialties companies’ product is aptly named “MPS Sticky Filters ”.

When shooting images with digital cameras, the resulting image file is just ones and zeros. Camera manufactures have come up with an extensive array of engineer-designed filters in order to incorporate a white balance correction code, into a digital image file, in order to make white look white. This is your cameras “white balance” presets, and they are important.

When shooting a scene lit by (lets just say) a florescent light source, one would set the cameras white balance preset to “florescent”, and then simply shoot away. The resulting images should be rather close to the correct white balance, well, in theory that is. But what if we feel the need to introduce some more light, perhaps some flash, into the exact same scene?

In the above shooting environment we set the cameras white balance preset to “florescent”, but the extra light entering from the flash is not the same color temperature as a florescent bulb. The resulting image will not look right at all. The two color temperatures will be fighting against each other, and the resulting image will look odd.


Here are some common methods to help deal with this problem.
First, you could add more and more florescent bulbs (and only florescent bulbs) to the scene, in order to achieve the extra light you need for the image.

Secondly, you could shut off all of the florescent lights, and use only flashes, being sure to change your cameras white balance setting to the “flash” preset.

Thirdly, you might alter the added light sources (flash) to match the florescent light. Hey, that sounds like the easiest way to go!

Introducing the MPS Sticky Filters .


The MPS site explains what their product does as this: “The MPS Sticky Filters convert the color temperature of the flash into the same color as the existing ambient light source so there will only be one color for the camera's software to correct for. The result is an image with natural looking colors throughout the scene, even where the flash didn't reach.”

Let me add that each MPS Sticky Filters  color correcting gel comes in two each, or they come in pairs.

But how well do they work? Time again for a fun “product demo shoot”… I set up a scenario with the above mentioned lighting troubles. It is just another simple setup with a hand bag and a set of color correcting targets on a tan backdrop.

I decided to use florescent bulbs, hanging above my subject, as an available light source. I set my cameras white balance preset to “florescent” and this is the resulting image (top of two images below), and with an accurate color adjustment later done in Photoshop (on the bottom of the two images below). The color shift is remarkable.


As you can easily see, the image on the bottom is color corrected, while the one on the top is at best; close (as in horse shoes and hand grenades that is).

Then, in the images below, I added a single Nikon SB-28 flash (left), without anything on it as far as color correcting gels, and took an image. Here (right) is how it changed the images white balance. MPS Sticky Filters


Wow, the color of the flash ruined the image. I set the cameras white balance to its florescent color preset, but it actually looks somewhat better, right?

Lastly, I placed a MPS Sticky Filters color correcting gel titled "unknown Florescent" on the flash, and took these, the final two images.

MPS Sticky Filters
This is the best overall shot of the bunch. The gel (from MPS Sticky filters) on the flash appears as an even, more intense florescent light, acting as a fill light. My flash appeared to be a florescent temperature!

MPS Sticky Filters  come in five different colors: .5 Tungsten Bulbs, Cool Fluorescent, Warm Fluorescent, Unknown Fluorescent, and Hazy / Open Shade. The instruction sheet that comes with the Sticky filters explains exactly which filter to use in just which available lighting conditions. It all worked out to be easy and I was done in seconds flat!
Please feel free to comment with any questions or ideas, and as always, feel free to subcribe to "A.T.A.P.". Each and evry one of you is very special to me!


In closing I would like to say that the MPS sticky filters would be at home in any photographers gear bag. These clever devices can make color correcting and hard to light shoots, a breeze. They are fast in use, and the results are very good.


Friday, April 24, 2009

Using everyday household items to enhance your images.


For the secretary image above, it became obvious that a simple gray background would not be enough. Using a simple set of Venetian blinds and one Nikon SB-28, a cool window was made.

All I had to do to create a window effect was to cast “the reverse” of the blinds openings onto the gray seamless paper, on the back wall of the image. The viewers mind is tricked into seeing a long shadow cast from an open window, splashing its’ light onto the back wall.


I also staged several SB-28’s around the outside of the scene to add some pop and detail to the typewriter and the fan. I (again) used grids and snoots on the flash heads to make sure that no extra light contaminated the desk top or model.

I like the overall images from this entire session. Bottom line is that we both had a lot of fun and we both came out of the shoot with what we wanted. She got some really fun portraits of herself and I now have some new stock images!


Anything will work in a pinch. Often times I will use plants to get really cool backgrounds. Simple plastic water bottles are used sometimes, with cool results. Try out different combinations of everyday items and notice how much more interesting things get. You are limited only by the limits of your own creativity.

If you are seeking a sharp shadow detail with your found objects, place them at about half of the distance between the flash and the background. For a softer contrast between light and shadow, place the found object closer to the flash. The closer the found objects are to the background the sharper the contrast will be. The rest is a matter of turning the intensity of the flash up or down, and situating the found objects into the way of the flash in order to cast it where you want it to appear in the image.

Tuesday, April 21, 2009

Lighting for the Vintage look without a beauty dish; part one.

To begin, I need to give credit where credit is due. The catalyst that sparked this fun photo session was Jim Talkington images and his great blog Pro Photo Life blog. I studied his techniques for lighting these particular images, and then went from there.

Here are the subtle differences between Jim Talkingtons’ lighting setup and mine.

Making the vintage portrait….


First of all, Jim used several studio sized flash units, one of which had a beauty dish reflector attached. I did not use a beauty dish nor did I use several large strobe units. I used one Alien Bees studio sized flash with a softbox, and a couple of Nikon SB-28's for hairlighting and the background lighting.


There are some way cool DIY tutorials online if you wish to make your own beauty dish; here, here, and here , but mine was not finished at the time of the shoot. I decided to go with three flashes instead, as Jim Talkington did, but in a slightly different fashion.

Jim spoke of the old flash equipment that photographers would have used at the time that his vintage portrait would have been taken, way back in the day. He emulated this effect using a beauty dish to remove any shadows in the models face in his images. He is a very smart man as well as an incredible photographer.

I added a softbox onto the AlienBees monolight flash head for the models main light. This gave it the overall softness that I was seeking, but it failed to remove all of the shadows on her face that the (vintage) harsh and powerful flashes would have removed. Instead of getting “little to no” shadow, I got a half lit/half dark face. A simple white bounce reflector was placed opposite the softbox, and aimed at the dark half of the models face. This helped light the darker side of her face without overpowering my directional mainlight.


Next I moved on to light up the background, and I used a “snooted and griddedNikon SB-28 with one of my remote triggers to do that. As for the setting of this flash: I just “let er rip”, and then I powered it up and down until I could see a nice gradual fall off of light between the center of the flashes spot and the edges of the fall off. I kept shooting and adjusting until I liked both the size of the spot, and the intensity of the spot.

Behind the model is a flash stand with the above mentioned SB-28 flash on it. It was aimed directly at the background (seamless paper). I also put a blue gel on this flash, and only for the color images. It seemed to add a bit of pop as well as some separation between the model and the seamless paper background in the images. I placed her in the scene as to hide the gear behind her.

Lastly, for even more separation and depth I burned her from behind with another SB-28 flash. This one is low, pointing up and at the camera lens. It took some adjusting to get it close, and then it was only a matter of personal taste. I did not use a grid on this flash as I wanted the light from it to strike her all over, but not penetrate too deeply towards her front side.


Lighting for the “secretary images” will follow….

Sunday, April 19, 2009

Making a fun avatar at home.

So many places on the web allow us to keep in touch with the world, and in so many cool and fun ways. Most of these sites allow for the user to put up an avatar, or a photo of themselves. Why not get creative and show a little about yourself in that one “all important” image?

I have heard that some types of images that are used as avatars are a must have. Myspace users agree that an image of yourself in your car is perhaps the holy grail of avatars themselves. Lest we forget the hand held, high as possible, snap shot of ourselves that seems to grace every community type of site imaginable.

After I wrote this post I saved it, and then wondered if it would ever peak someone else’s interest. Well, not too long after I received an email from James of BroMar Photography who found my avatar on my Model Mayhem site, and posted a question on this very topic. Funny how we get what we ask for from life, eh? James, here we go, and from the beginning.


For a fun and new avatar I decided to revert back to my high school days. It seems that one of the most important traits that one needed to obtain was to learn how to make smoke rings. I tried and tried, as I made faces much like a sucker fish might, but I never truly got it down.

Years later, I still struggle. Blowing smoke rings doesn’t mean much anymore, but what a funny thing it was way back when.

To make this image I used several flashes with stands, snooted grids, and one softbox. I placed the camera facing me on a tripod, and used a self timer to snap the image.

I placed the camera in manual focus only to make sure that it would not continuously struggle with focusing sharply on me. I wanted the resulting image to put me slightly out of focus, yet be sharp on the smoke rings. The rings would be just in front of the lens, as I was back several feet.

I used a speed of 200th of a second in order to remove any ambient light. I used an aperture of about 2.8 in order to make sure that I would be out of focus while the rings were not (depth of field/depth of view). The light that was making the image was placed in three different directions, with only one hitting me.

I placed a Nikon SB-28 in a softbox, high and to my left, pointing at me, in order to illuminate my head and shoulders. Next, I placed snooted grids onto two more SB-28’s, and aimed them at each other, just beside the lens. I had to use snooted grids because I could not allow the light spillage to enter into the lens, or have it come back to light me.

I placed the two snooted SB-28’s just in front of the lens, aimed at each other and slightly placed one ahead of the other one to allow for a deeper path of light coverage. I couldn’t make sure where the smoke rings would be at the time that the shutter released so placing the two flashes in this manner gave me a little bit of insurance.

After adjusting the levels, it was time for the shooting to begin. Can you believe that I captured it in only three tries? I was impressed! Under pressure I was able to blow smoke rings, and get a shot of it as proof! Wonder what the bored people are doing with their extra time?

Thursday, April 16, 2009

Vintage Hollywood portrait and Secretary shoot.

Not too long ago it was brought to my attention that a friend of mine (Adrien) had a knack for the vintage look. Not only could she pull it off, but she enjoyed dressing up for the “vintage pin up girl” look.


She wanted to capture this vintage feel in some retro-like portraits. I came up with a win/win for us both. If she wanted to get dolled up for the shoot, and sign a model release for stock work, than we could do both portraits and stock images at one time.

First I found this very cool image at Pro Photo Life that Jim Talkington made. It has the look and flair of a retro looking, vintage Hollywood portrait. I liked what he did, so I set out to emulate this look for my friend.

Next, I decided to set up a secretary scene with some props from the same era in time as the look of the model. I envisioned a rebellious young woman sitting at a desk snapping gum and filling her nails instead of working too hard. This idea was what would become my newest stock image idea.


The creative lighting setup that I used will follow this post in the next few days!

Saturday, April 11, 2009

The 10 things you must have before you shoot your very first wedding!

Often people are not too sure what a wedding photographer should have before their first (or even their next) wedding. I fell into this category as a beginner wedding photographer. I am not saying that I am the best, but I am saying that I have learned a lot about this very topic from my own experiences.

Here are ten of the most important things that you must have before you photograph your very first wedding.

Here they are, and in no certain order.

1) Confidence in yourself.

Well, if you have done things correctly, than the big day is here. You are about to photograph your very first wedding, but you are more nervous than the bride. That’s normal for a first timer, and here is why that is, and what to do about it.

Weddings are a one time chance to make or break you. Word of mouth spreads faster than any other medium of advertising. If you make a mistake and miss the money shot, or a series of money shots, than it will be all over the “word of mouth” news. However, if you manage to capture each and every shot that best shows the ceremony in great detail, than you are about to be a wedding photographer celebrity.

There is one great secret that will prevent you from becoming the worst wedding photographer ever. That secret is practice.

Devote time to practice shooting inside of wedding chapels, reception halls, churches, and outside in the great outdoors (under several different conditions). Notice what you have done in order to get a better capture than the last one. Keep a note book with this very information in it, and read it later as you think about the upcoming event.

Know in advance how the wedding day events will unfold. This will allow you to be exactly where you will need to be to get the best possible shots. Knowing what is about to happen is gold when it comes to wedding photographers.

Become familiar with your cameras settings. How to access “this or that” setting in the menu and just exactly what all of the buttons and dials actually do will make you more proficient. Learn how to quickly adjust from one setting (inside and dark) to another (outside in full sun) using said menus, buttons, and dials. Submit these routines to memory.

Lastly, become a good location scout. Find out where the wedding and the reception is going to be held. Scout the wedding hall, as well as its’ grounds. Next, do the same at the reception hall. Practice with a friend as the client, filling in at these places. Keep a log of what you set your camera at in order to get the best possible images at these places. This will all pay off both in self confidence and in great wedding images.
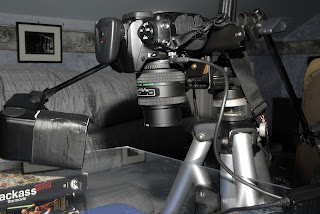
2) Know your gear.

Knowing what is available for you to use in your gear bag is a huge asset. “What lens is the best choice for which settings”, and “what else should I try with this or that shot in order to make it better”, are questions that you should always ask yourself during any photography shoot.

Having nice gear is a plus, but not a necessity. I captured my first wedding with a glorified digital point and shoot camera. Hind sight is honestly 20/20. The lens did move in and out as a zoom, but I can’t even imagine what the actual aperture settings were for this camera. It made for some really blurry images. This just goes to show that whatever gear you currently own; it can be used to photograph a wedding.

When it comes to lenses, fast glass is also a plus. Opening up to an aperture of 2.8 will let in enough light to stop most movement with out any blurring what so ever. If you can, make sure that the lens that you use the most often is your best and fastest glass.

Know in advance where you would like to shoot from when inside the wedding chapel and the reception hall. Proper scouting and a good flow of the day’s events in advance will give you these locations. Don’t get complacent, keep your eyes open and scout these locations thoroughly! See the best possible image in your minds eye, and ask where is it that you need to be standing and what gear to use in order to capture that very shot.

3) Backups of backups.

Whatever can possibly go wrong will go wrong. Know one knows why that happens, it just does.

Ask yourself what you would do if your camera failed to operate during the wedding ceremony. Not a good situation to find yourself in, is it? Now is the time to start thinking about this very scenario, or instead, how to avoid it.

First of all we can’t all afford to purchase two or three of everything. We wouldn’t be looking to start photographing weddings if we had that kind of cash, right? What exactly is it that we all should do when it comes to this very topic of preventing failure?

The easy solution is to make sure that your gear is in tip top shape. Make sure that it is serviced regularly, and it remains in a safe environment when not in use.

Next, think about which piece of gear has the most moving parts. This is the piece of gear that might just be the most likely to fail. Now, if you can’t purchase a second one, you should rent one. You should do this because someone else’s memories of a once in a lifetime event are counting on you not to fail!

I own two camera bodies. This is for two reasons. First, if one fails I always have a second one to shoot with. Secondly, I can keep two different focal length lenses in constant operation throughout the wedding by simply switching cameras.

Reinvest in yourself by owning backups. Take some of the money that you are making and put it into having a second way of capturing the weddings that you are responsible for capturing. You will thank yourself for doing this, trust me!

4) People skills.

People skills are an absolute necessity when it comes to being a wedding photographer. The clients need to be comfortable knowing that you are about to become a major part of their special day. You will need to answer questions from the wedding guests and you will need to routinely direct the wedding party when photographing them.

You will need to be soft in your words, yet be reassuring at the same time. The bride and groom will look to you for advice because you have been through a ton of weddings before, and they have not. They will not know if things are running smoothly or not, and it will be up to you to reassure them that things are under control, even if they are not.

You will, from time to time, need to assure the bride and groom that they are safe while under your careful watch. One way to do this is to take charge. Do not go off and bark orders or constantly remind everyone that time is money. What I meant is suggest that the wedding party do this or that, but always allow the bride and groom to either “yay or nay” your kind and thoughtful suggestions.

A second thing that I like to do, in order to show that the wedding party is safe in my hands, is to adjust the bride, groom, and the wedding party from time to time. Stopping the shoot in order to adjust a tie, or fluff the wedding dress shows that every detail is safe in your hands. Keeping a constant vigil on the smallest of details reminds all that attend that you are there to make things flow nice and safe.

5) An eye for detail.

Having an eye for detail, in my humble opinion, can make or break a wedding photography session. Every detail (no matter how minute) that you can manage to include into the wedding images will help preserve the special day for years and years to come.

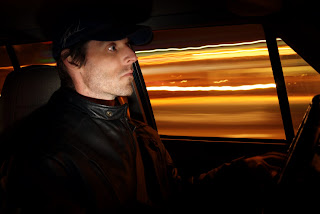
For example, making sure to photograph the table full of name badges always looks great in the final wedding album. Showing up early and capturing the church in an amazing sunset will last decades as “the shot that made a bride cry”. There are so many details on a wedding day that you could even hire a second person to do nothing else except shoot the minor details of a wedding. The shoes, rings, flowers, cake, cocktails, attendees, well heck the list goes on and on.

Each of these thoughtful images should go into the album collection in order to make it feel special. It will make the bride and groom think that you really went over the top to ensure that their special day was well preserved. Plus, 10 years from now, when they look through the album that you created, it will make them feel as if they are right there again. All of the little things that they have forgotten about will be right there looking them in the face.

Details, no matter how small, can be just as important as the event itself. Keep a sharp eye out for the little details, and capture as many as possible!

6) Appropriate footwear

Just what on Earth is appropriate footwear for a wedding, and why is it on the top 10 list of most important things for wedding photographers?

Well, here is the scoop, in my own tale.

If I were asked to sum up my first wedding, I would report that it was a marathon. I assumed that I was in good enough shape to photograph a wedding. It sounded easy to me, even though the burden was stressful. Little did I know exactly what I was in for.

I had to run around the wedding chapel more times than I could count in order to capture the people entering and leaving, let alone the exchange of vows. I had to leap over bags of gear, and run up and down several flights of stairs, constantly. At the reception I found myself sliding across the reception halls’ floor making sure to find the best angle to shoot from, and that was even before any of the dancing started. Add to this the fact that it was at least a 12 hour day, and so I was exhausted! My feet hurt, and I was wondering if I had what it took to finish the day out.

By simply choosing comfortable shoes I found that all of this added stress could be cut away to zero. Endurance could be extended to higher levels by simply wearing better shoes. Keep in mind that no one wants to see the wedding photographer running around in Air Jordan’s, but there are a ton of shoe manufactures out there that make black or brown running shoes.

7) Know your abilities.

I love to say “Yes” and I say it way too much. I want to perform in the utmost professional fashion that I possibly can. Nothing bums out a mood like a stern “No”.

With this comes a very common mistake. The truth is that satisfying clients is very important. Knowing what you are capable of is most often even more important.

Can you provide coverage of everything that the clients want all by yourself? Should you look into hiring a second shooter? What about hiring an editor for the images or a perhaps a wedding album designer?

These questions need answering before you commit yourself to a quote when bidding on a wedding shoot. Knowing just how much you are capable of means everything to a wedding quote! You will need to include the costs of each and every thing that you “sub out” to others (editing, album design, printing, ect). Hiring others needs to be the clients’ responsibility, and letting them know that is extremely important.

Lastly, getting comfortable with your own limitations before you get in over your head will come with the business. We all make mistakes. We all want happy clients. Finding the way to explain your own abilities and your own limitations is crucial when booking weddings. Once the clients know how much is possible they will be fully understanding of including extra costs into the quote for any extras that they may wish for.

8) A formula for your price

Perhaps a better title would have been “a working formula for your price”. This formula needs to reflect exactly what it costs you to photograph a wedding. Some of the most often overlooked items for this formula are time editing images and your business overhead.

Perhaps a simple formula might look like this:

Business overhead (what it costs you to be in business each day)
+
Length of event (hours)
+
Transportation to and from the shoot
+
Creative fees (Days editing the images, album creation, ect.)
+
Printing costs
+
Your profit
…………………

=Wedding quote


9) The wedding gig itself.

How is it that we get the wedding gig itself?

Do we spend fortunes on advertising in hopes of getting enough weddings to get back the initial cost of advertising? Will simple word of mouth work? Do I need a wedding portfolio or a fancy website to do the bidding work for me?

The simple answer to all of the above is “no”. What works best for some may not work best for you. If you are starting out fresh, without anything like a website or a portfolio, I would suggest getting humble.

What I mean by “humble” is to shoot weddings and portraits for free. Find some pre-wedded couples that are hard up for the cash to spend on their wedding. Volunteering works both ways. You do a nice deed for them, and you get images to put into a portfolio and your new website. Karma also comes your way, which is priceless.

Perhaps the best part of shooting for free is that you have an amazing vehicle for learning the ropes. All of your wedding photography questions will get answered as the day unfolds itself. Besides, when you shoot for free there is little to no pressure to perform at maximum capability. You can make some mistakes and it will be O.K.

As the jobs come in from word of mouth and the new images that you have, you can invest in newer and better marketing. It becomes an upward pyramid of success, as long as you both get humble, and then continue to devote some time into it.

10) “Following thru” skills

This is saying what you mean and doing what you say. Do not feel that you have to become a “Yes man”. Clients ask for all sorts of extra things, it is up to you to answer accordingly. They ask because they do not know the answer.

You can say “yes” or “no”, or something even better. Explain that if you agree to their request for something extra it will cost you time and money. Relate to the client that you might be willing to perform the extra item, but at a slightly inflated cost. No one expects you to do everything for nothing, well, except maybe some of the folks that recruit on Craigslist.

If you have the ability to include some extras, make sure that your client knows about it. Leave it up to them to accept your offer, or not. They can’t purchase what they don’t know exists. On the other hand, don’t be afraid to say no.

Bottom line is that you need to follow thru on exactly what it is that you said you would do. This applies to posting images, burning image CD’s, album creation, and whatever else you were asked to do.

Following thru is what separates the professional from the novice. You do not need to have the best work ethic on the planet, but just do what it is that you said you would do. Remember, word of mouth can make or break you as a wedding photographer.

Sunday, April 5, 2009

Macro shooting made easy and fun.


Some time ago I had decided to set up a simple, yet time proven, macro shoot set up. I had been told about a professional photographer in N.Y.C. that used sheets of glass in the 80’s as we use layers in Photoshop today. Without seeing her set up for my self, an idea for a fun way of making backgrounds in macro photography entered my mind and has never left. I will say that I have played with macro photography a lot and have shot horizontally and vertical in the past.

The troubles with my macro photography that I have come across in the past is both holding the item to be photographed and making a nice looking background in the macro image. I have sent numerous designs onto white seamless using flashes with varied results. I all too often resort to using either an all white or an all black background, and that can get boring. I made amends with my not-so-successful history of macro, and ventured into troubled waters once more.

First of all I need to explain the parts and pieces that were involved. I purchased a small sheet of plexiglass at the local hardware store. I made sure to get one about three quaters of one inch thick so that it would not bend under the weight.


I also have a Stroboframe “Lepp 2” dual flash macro bracket. It is simply a bracket that mounts on the bottom of your camera, and your tripod, with two adjustable arms designed to hold flash heads where you need them to be. You might notice that these brackets come with mini ball heads on each of the two arms for holding the flash heads.


I opted to remove them, in order to hold my EBay remote flash triggers. I could have slipped the triggers onto the ball heads but the flash heads were tall enough without the mini ball heads attached, and the flash heads are designed to rotate in as many positions as the mini ball heads will.

Then I opted to install a Nikon MC-30 remote shutter release onto the camera. When you are shooting up close macro shots any camera shake results in a blurry image. Firing the camera remotely makes good sense.

I used two of my Nikon SB-26’s flash heads with my home made girded snoots to light two separate things. One flash would light my subject with a clear hard light from the side. This would illuminate any detail of the subject. The second flash had a blue gel on it, and only lit the bandanna.

I started in with ironing a solid blue canvas bandana that I have had stored away. Ironing is not one of my better trades, but I was in the military, so I know my way around the iron itself. I placed the canvas bandana onto a T.V. tray, and stacked VCR tapes on the left and the right of the bandanna. I did this to hold the plexiglass up off of the bandanna, in order to help “blow it out of focus”. I use the VCR tapes as stacking blocks often as I already own them, and they are all the same size as each other.

Blowing the bandanna out of focus was important. I wanted the blue to remind the viewer of an ocean type environment in which the sea horse would be most likely spotted in. Removing the detail of the weaving (and wrinkles) of the cloth was important as to not give away what it actually was.

I knew that Macro lenses, set to a shallow depth of view, will help to throw stuff out of focus by themselves but I wanted the extra separation between the objects and the blue backdrop for two reasons. The second reason is that I wanted to light the blue bandanna with a flash, but not have this be too obvious. The flash would bounce or reflect off of the clear plexiglass and give it away unless I raised the plexiglass up and stuck the “blue gelled” flash underneath of it.

Next I turned on the blue gelled flash, and got it set to where I liked its’ intensity and its’ “roll off of spillage” around the edges. I then placed my subject into the frame. Then I started working the second flash, in tandem with the first flash, until I liked the mix of the two. This second flash took some time as I needed it to help show the detail of the subject as well as light the subject overall.


I shot the nickel as to show you all the size of the overall frame. You can shoot this set up with any sized objects. You can also get in very close, and show amazing surface detail at the same time!