Being a full time art student and trying to hone my techniques and grow my photography business has taken its toll on my blog entries from time to time, and this past week or two is just an example. Whew, have I been busy! With a couple of midterm tests past, I can now jump back in to the blog world, and that is great since I have so much that I wish to share!
First of all, congrats to all of the graduating high school seniors out there! I have met a few as of late, and I could not be more proud of them.
With that said, please allow me to update my photo blog with a fast rundown of jobs, and the details of these jobs. To market myself, I have decided to put together a portfolio of work. Problem was, what do I put into this portfolio? After some time, I decided that I want to photograph several different things, for a living. I like to photograph people as well as merchandise, both in studio and on location. My goal became to "hook up" with people and merchandise that resemble my target niche. So, after much thought I came up with my plan of attack.
I had some images that I could use for my portfolio already, from recent projects and weddings, so the ones that I was lacking were first on my hit list. I needed some examples of my portraiture of people, as well as some studio photography of objects. I came up with some "win-win" propositions for some local folks, and it worked as planned! The "win-win" goes something like this: "let me photograph you, and you can have some of the images for free". Who could resist that?
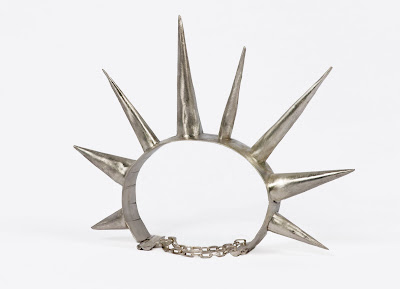 For the merchandise shots, I asked a friend that is honing her own hand-made jewelry marketing skills if she would like some images for her portfolio. Turns out that she was in need of someone with a decent photography studio to photograph some of her newer pieces. I could not have asked for a better line up!
Now, with my target niche in mind, and some people and merchandise all lined up, all that had to happen was the photography. I set up a date and a time to meet with the jeweler friend. We met at my studio, and we spent a few hours shooting her rings and necklaces on different colors of seamless paper, a sheet of glass, and I shot it all using several flashes and reflectors. Now we both had exactly what we needed, which is a true win-win!
Than my brother and his wife called, and we decided that I would photograph her two boys, which are both seniors in high school. That covered the male side of my portfolio, but what about the female side of the spectrum?
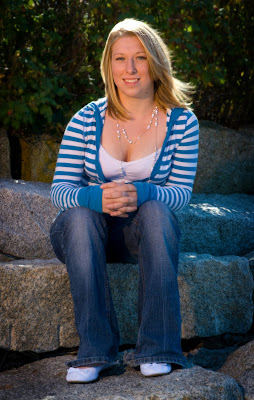 I met a local high school model thru a modeling website. I ran the idea of a free shoot by her, and she too agreed. I later found out that she had not yet had her senior photos taken. This was really coming together, and people were truly getting what they needed! With my feet still tired from the first two photo sessions, we decided to meet that very next weekend!
We met and shot on a great day, at a great location, and it went very smoothly. I had to use a single Nikon SB-800 flash on a flash stand for the days' lighting because my new assistant could not make it. Necessity was the mother to creation on that shoot! I used a daylight colored gel in the diffuser on the flash, and I really like the results that we got! The combination of location and the gel make the images appear to look like a setting sun was behind the camera. Needless to say I should have been shooting this way from the start, but now I realize that I can do this on my own!
Next, after a few afternoons of editing time, my new portfolio is looking very well stocked with fresh new images. I feel comfortable moving on to the next phase of my marketing for some new photography business. With several wedding, engagement, newborn child, senior portrait, children, and some merchandise photo sessions under my belt and in my "portfolio building" folder, it is time to think about marketing.
It would be nice to copy someone else's steps, but I don't have that luxury. What I do have, though, are a great collection of well established professionals that are solid friends. I am leaning towards assembling my portfolio images all together and have a simple coffee table book made up using them. Nothing over the top, but instead a simple, sharp looking album that I can use as a portfolio. I have put some thought into making several separate portfolios, like one for merchandise, one for weddings, and one for portraiture, but the cost might be too much for me to absorb at the moment. So, I decided to place all of the portraiture images in the portfolio, at the front, and then keep the merchandise images towards the back. As I get some work from my marketing ventures I can always have several "niche" portfolios made up and then use them to target a more specific crowd.


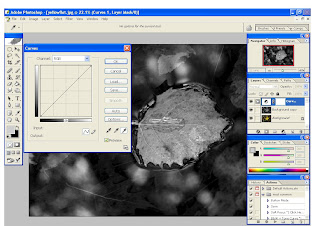
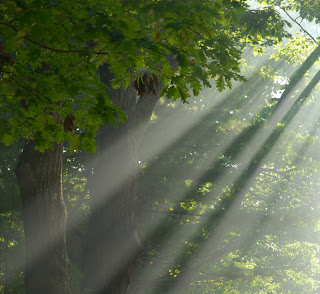 Let's assume that I have finished all work on the image. Vignettes should come last on the workflow list. Each vignette that I do I do separately. I like to make them as custom for each image as I can. Nothing is worse than a "loud" or obvious vingette, plus they are a fast thing to add to an image. With this image open in Photoshop, simply drag the background layer into the copy layer icon, and then you will have a copy of the original layer to work with.
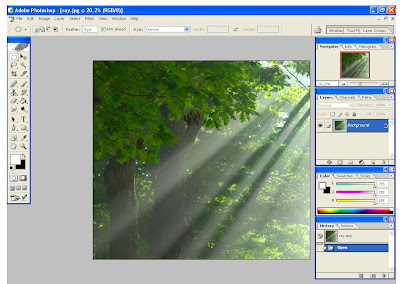 In the layer pallet well, change the layer overlay style, or type, from normal to multiply. This type of overlay as well as "overlay" seem to work best most of the time for vignettes. Your image should turn dark, so stay with me as we will make it look good, I promise!
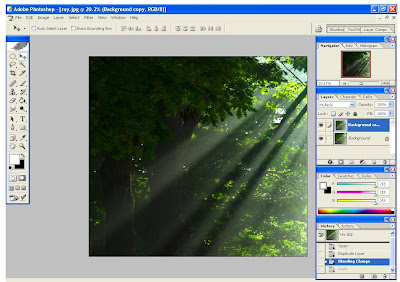 Next, select the elliptical marquee tool, which is in the upper right hand corner of the tools well. A quick note about this tool: If you press and hold down the shift key as you use the elliptical marquee tool you will get perfect circles. If you use just the tool you will get ovals. I used the oval option, or without the shift key, for this particular image.
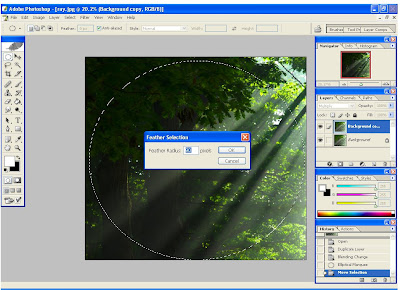 The very next thing for you to do is to press the "Delete" key on your computers keypad. This erases the center of our multiply overlay, leaving the edges alone, or leaving only the information outside of our feather.
 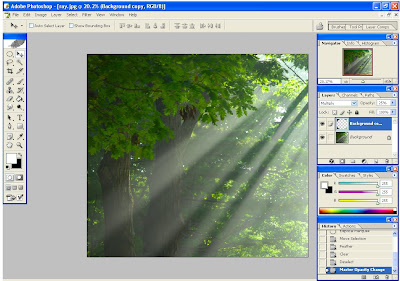 Adjust the opacity of the multiply/feather vignette layer to taste. I usually aim for about 20 percent. Lastly, you can look under the "layer" heading, and choose "flatten image", and save it as a JPEG.
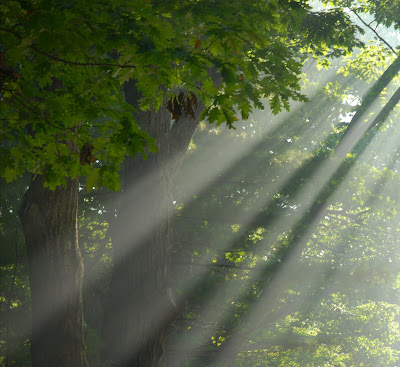
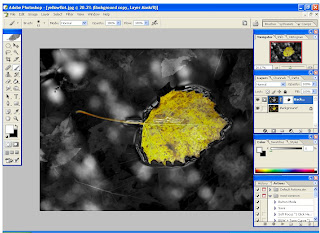
 I should take a second and explain something that Vincent Versace explains in one of his tutorials. He tells us that we should start our editing process with the largest over all fix first, and then work our way to the smaller fixes. For example, if we need to color correct, than that should come first. Removing some acne on a face should come later, as we edit. With that said, lets assume that this image above has been color corrected, and every other major edit has been performed already. We only want to get it to a nice looking black and white with only some "color spots".
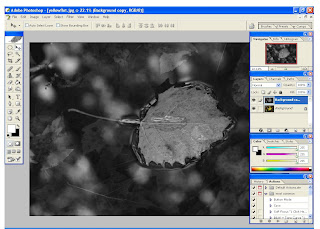 Next we are going to dial in the blacks and the whites. This can be done in a number of different ways. I will show you a couple of different ways to do this, here in this blog entry. The different ways that I will show you are perhaps the two most common. Performing both of these on each image that you edit might be overkill. The idea here is to show you a couple of different ways that you can use with any image that you wish to change to a black and white, and then you can find what works best for you.
 Now there is something that you might need to do before moving on. If the new (levels) adjustments seem to be too harsh looking, or too intense, then you might want to tone them down a little. You can do this by lowering the "opacity" of the new levels adjustment layer in the layer pallet well.