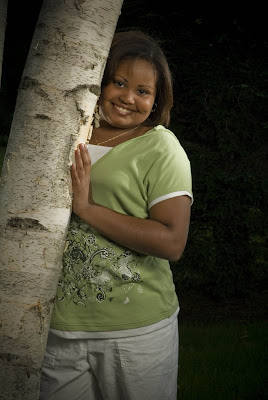
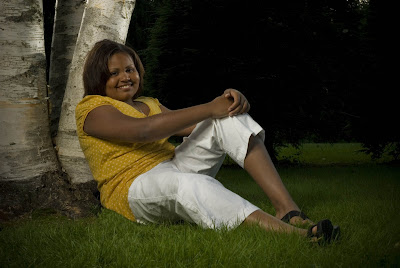
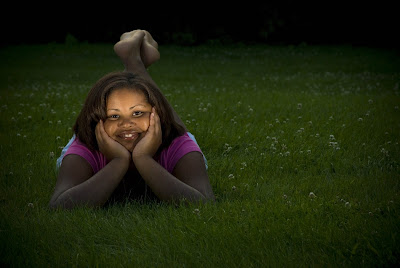
What a great time we all had on my most recent photo session! Celina was my victim in this case, and she had a ball. She wishes to enter modeling, and I am only happy to help her. We met in a local cemetery, set up some Nikon strobe units, and went to town. The pesky bugs came out too, and I am still itching like crazy! Maine and the blood seeking bugs, go figure!
I set two Nikon SB28 flashes behind an umbrella, just to diffuse the harshness from the flashes a little, and aimed it at the prettiness. I played with two Nikon SB-800 , snooted and gridded, to add back, hair, and/or side lighting.
The laying down image needed less lighting overall. It was mid-day sunshine, so only the two Nikon SB-800’s were used. The sun was almost entirely eliminated, in camera, and the flashes were brought in to light only her face. The two Nikon SB-800 flashes were snooted and gridded, and aimed out from 45 degrees, and six feet away.
Thanks to Celina and her family. Thanks for coming by to visit. Feel free to subscribe by typing in your email up and to the right, in the box!
Being way too anxious to show you my images, I neglected to allow a way for you to compare with a before and after viewing of the images that I put up last time. Here are the before and the after images for you all.
Before
After
As you can see, I first put in a blue sky. The day was overcast, which was perfect! No shadows and such a great natural diffused light. Next I darkened the back ground mountains, and followed up with the second mountain from the front. This gave it some depth. I burned the foreground as well, as to make it less distracting to the eye.
Next, I added some cool and warm hues to the rocks just to add depth as well as lighting details.
With all of the recent action on the web dealing with photographers exploring portrait sessions in which only one light source is used, I figured that I would show some of my recent work. Strobist has been running/posting a very cool series on this very subject, and a lot of people have been responding to it.
When I set out to capture portraits using only one light source, two different things usually come to mind. First, I (most often) will bounce in light against (or aimed at) the initial lighting source. This adds fill lighting on the subject. Technically, only one light is used but it does come from two different directions. This helps to remove any unwanted harsh shadows.
The second thing that comes to mind when using only one light source in portraits is getting a harsh, almost extreme shadow. Here are some examples of both versions of “one light portraits”, and all taken this weekend.
On this occasion I set up the lighting in a very easy to set up, and easy to use manner. I placed two Nikon SB-28 strobe units onto one adjustable lighting stand. I topped them off with an umbrella just to provide a larger lighting surface in order to diffuse the light coming from the two flash units.
Fill lighting was supplied using a simple silver reflector, which bounced the strobes initial light back at the subject. Pocket Wizards were employed, for the first time, and I must write a nice big “thanks for the gear loan Scott, over at Weekly Photo Tips”!
With the two strobes, Pocket Wizards, Quantum Battery pack, and an umbrella all on one stand, I found it was simple to move the “kit” around to any spot that I wanted, and it was just as easy to “aim the strobes and then shoot”.
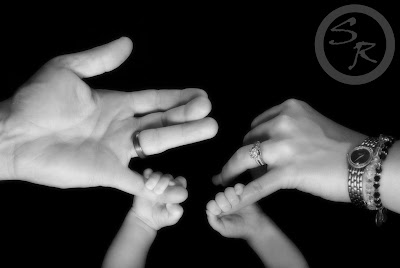
The set was also done in a simple way. I placed a sheet of black muslin onto a backdrop stand, and then placed a desk under (and in front of) the muslin and the stand. I draped the muslin over the top of the desk to make for a large black background. A pillow and a blanket were hidden under the muslin, on top of the desk, for the child’s safety.
In the above image the light stand was placed low, and just in front of, the desk. Next, I placed the silver reflector above the desk, just above where the hands were going to be. The reflector was aimed back at the strobes in a way that light would be reflected back into the place where the hands were going to be. I asked Mom and Dad to each provide a finger for the child to grip onto and the baby just did what she thought was natural. Perfect!
I placed a black out card/reflector between the back of the strobe stand and the camera, just to make sure that there wasn’t any unwanted light entering the lens.
This image was done in the exact same set, using the same lighting and reflector. I love how the baby is gripping the hand of the father. She is so cute.
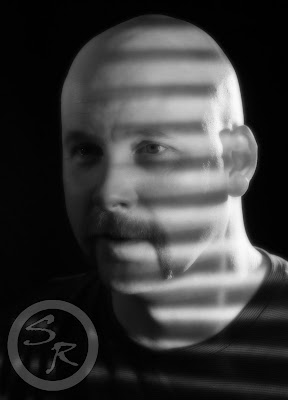
Here is what I meant by a harsh, contrast rich shadow with a half lit face. This was accomplished by placing a set of blinds between the strobe (bare flash with a snoot) and the subject. I also used a second light just to add some light to the right side of his head. So, two light sources and a reflector was used for this image, not one. I took this image just for this blog post, but it seems to be growing on me.
Well, thanks for stopping by. Feel free to subscribe to “All Things About Photography” by simply typing your email into the box! That is just to insure that you never miss a post. Comments are also always welcome!
With the summer season comes so much for us all to do. Slowing it down (or even stopping) every once in a while to smell (or photograph) the flowers is a must.
One image that I took several years ago of wild lupines has done rather well for me in stock image sales. I have not sold a bunch of copies, but it holds the highest sale price recieved out of all of my stock sales. I still ponder about just who purchased it, and where it has ended up. Maybe someday I will notice the image somewhere special.
So, stopping the car and getting out to photograph a field of lupines just seemed like the right thing to do at the time. “Istock images” actually allowed one of these lupine images to be listed, which is getting harder and harder to accomplish. So many folks try to get their flower images listed that “Istock images” has quickly filled up with them, and they have since grown tired of such images.
Lengthy exposures
I spent this past week impersonating a mechanic. The salt that gets spread on the winter roads here in North American sure does a good job at eating away floorboards. After taking the seats and the carpeting out of my car I started to grind away on some metal. I would rather be shooting images.
So, I took some time away from the grinding to do some HDR work. One image is called “Blue Doors” and can be found in the town in which I live. It just begs to be photographed each time I pass by. Cape Porpoise is the location for the second image, which is where I often go to get inspired.
Please refer to one of my recent blog posts HERE to learn more about HDR photography. Then, please come back and learn how to set your camera up to take HDR images!
The camera that I will be using as a model in this post is a Nikon D200, but all digital SLR cameras operate pretty much the same, they just put the buttons in different places. Plus, you will need a tripod and a Nikon MC-DC2 Remote Release .
Bracketing explained.
There are many types of bracketing available to us in this; the digital age. With digital cameras come all types of bracketing options. Some of these bracketing options are white balance bracketing, flash bracketing, and exposure bracketing.
Exposure bracketing explained.
Often times dubbed the photographers insurance, exposure bracketing is used most frequently by the press. When a photographer finds him/her self in a fast paced shooting environment he/she needs to make certain to never miss the money shot. This is where bracketing and exposure bracketing come in handy.
Exposure bracketing can be set with either an aperture setting or a shutter speed in the priority. In other words, when used with an auto priority mode, you could set (lets say) the shutter speed (shutter priority mode) that you want to remain constant, and only the aperture opening would fluctuate with each shot.
Exposure bracketing is first set up in the cameras’ menu system, and then it’s turned on for use on the fly. Basically you are entering into the camera exactly how far apart you would like each of the exposures to vary in a series of shots, and how many shots are in this series.
Usually the photographer correctly meters (and adjusts) for the scene, and then snaps a bracketed series of images, all of which are of the same scene. When bracketing, each time the shutter release button is pushed a shot in the series is taken. In a typical series of three exposure-compensated images, one will be perfectly metered, one will be exposed at a pre-determined variable difference in exposure (either above or below) the first one, and then the last image in the three shot series will be exposed at a pre-determined variable in exposure (either above or below the first image) thus ensuring that one of the images will be perfect each time.
Simply put: three images are recorded, one perfect, one exposed for the shadows, and one exposed for the highlights. If you have a preference for what order the images are taken (from light to dark, dark to light, ect.) than you can program your digital camera to do just that.
Why bracketing for exposure is important in HDR photography.
Exposure bracketing is what we will use in order to take our multiple HDR images quickly. “Quickly” was used here because if the scene in our HDR image changes too fast, the multiple images will appear to be blurred once edited. This explains why most HDR images are of a static scene. Also, if you set the shutter speed (F-stop) to change throughout the bracketed series, the depth of view might change with them. This, again, makes for impossible editing for a crisp HDR image. Set your aperture to vary in your series of shots. I highly recommend using a Nikon MC-DC2 Remote Release when shooting HDR images, in order to avoid camera shake. Use of a tripod is paramount with HDR imagery, and for this very same reason.
I am going to use the “Manual shooting mode” for this HDR imagery tutorial. I most often keep my camera in manual mode, so it will be easier for me to keep it this way. To be more specific, we are going to set our cameras up for exposure bracketing, and we will want only the aperture to change and not the shutter speed. We will select the three image option for our bracketing exposures, and choose a one third of a stop increase and decrease for the series.
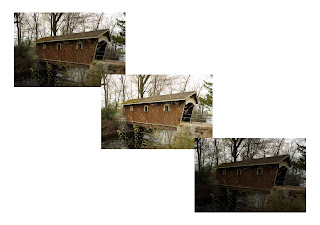
We will use exposure bracketing in order to capture three images of the same scene, but each one will have a different exposure. One image will be exposed for the overall scene, one will be exposed for the shadow detail (plus one third of a stop), and one will be exposed for the highlight detail (minus one third of a stop). Later, you will edit these three bracketed images down into one HDR image!
Before you start editing your bracketed images, please jump over to here in order to see several different ways in which to accomplish the editing task at hand. Also, I posted some great links to some great tutorials.
Nikon MC-DC2 Remote Release Setting the exposure compensation, made easy.
There are only a couple of things that you must keep in mind when setting up the exposure compensation in your camera for an HDR image. First, how many images do you wish to take in your series of the scene, and secondly, how wide of a difference in exposure do you wish to capture?
Too few images taken at the scene may make for a not so dramatic HDR image, while too great of a difference in exposure (stops) may be too difficult to edit. I suggest that you start easy, and as you gain the skills that are involved, then you will know how to better set up for your scene.
With ease in mind, I suggest that you start with a “three-burst” exposure, and at one third of a stop difference as an exposure. You can always alter these settings as you learn what works best for you.
Here is the easiest way to set up your camera for our HDR image, and then turn on exposure compensation once you arrive on the scene.
First, place your camera into manual shooting mode. Press the “Mode” button found on the top of the Nikon D200, and use the commander dial until “M” is shown in the top LCD window. Please see the images posted along with this entry for more detail.
In camera settings for bracketing.
Next is setting up the camera using the menu system. We are about to input the factors into the camera so that when we want to bracket we can simply turn the bracketing on and then shoot away.
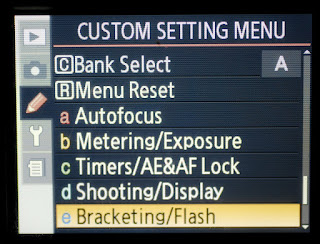
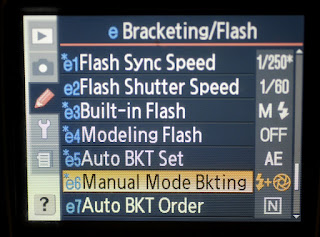
Press the menu button, found on the back of the Nikon D200. Scroll down to the pencil icon, and then select setting “E”, which is “Bracketing/Flash”.
Press the selector pad to the right and scroll down to, and select “E6”, which is “Manual Mode Bracketing”. We don’t want an auto mode bracketing, instead we wish to employ manual. Auto modes use one of the settings that we input, and automatically changes the other setting for a perfect image. This is not what we are looking for.
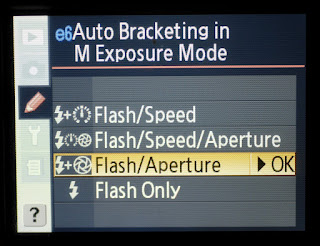
Press the selector to the right once again, and scroll down to, and select, “flash/aperture”. Press to the right once more in order to select “OK”. This step tells the camera that we wish to have the aperture change, and not the shutter speed, each time we shoot an image in our three shot bracketed series.
How to turn on the bracketing once we are on the scene and ready to shoot.
Study the scene. Decide on an I.S.O. setting, an aperture setting, and shutter speed setting that will correctly capture the scene. This should be the correct meter reading, and settings, for the scene that you are about to shoot. Your three shots will consist of this image, one image exposed above this, and one exposed below this.
Next, press the “plus/minus” button found on the top and right side of the D200. Rotate the main command dial to set your exposure compensation amount, in our case .03. This is how much (in stops and fractions of a stop) you desire the exposure to vary from image to image.
Once that is set, press the “BKT” button, which is the Bracket button, found on the back and left hand side of the Nikon D200. Press and hold this button, and perform the following:
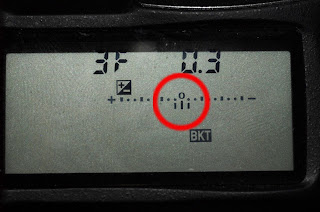
Turn the sub-command dial, found on the front right hand side of the D200, until it looks like the image below. The numbers shown in the LCD screen represent the two factors mentioned in the opening of this post. The number on the left of the LCD screen represents the number of images in our bracketing sequence. Setting to the right of this is the amount of exposure compensation. Make sure that this number is set so that the meter bar below shows one shot above perfect exposure, and one shot below perfect exposure.
Lastly, turn bracketing on already! With the “BKT” button pressed and held, turn the command dial until you see the bracketing icon appear. It is the “BKT” icon. This toggles the bracketing on and off.
Nikon MC-DC2 Remote Release
Compose the image, and then shoot. You will need to take three images, of course, but you knew that.
Thanks for reading the “All Things about Photography” blog, and feel to subscribe so that you don’t miss a post! As always, your comments are always welcome and posted.
Exploring the web the other day, I came across some awesome light painting sites and blogs. For some great people shots, I like what Light Painting.org has to show. The blog that complements this page can be found here.
A great place to learn about the history of light paintings humble artistic beginnings, visit Dark Roasted Blend. Many popular photographers works can be viewed here, and some are very comical indeed!
For a great video tutorial on how to create your very own light paintings, be sure to stop by one of my favorite sites, Digital Photography School. This is a wonderful resource, with tons of great information.
Thanks for visiting, and please be sure to subscribe as you don’t want to miss out! Please feel free to comment as well, as your thoughts mean a lot to me.
Here are six easy ways to become better at taking digital images, and to ensure years of enjoyment from your gear.
1) Take a local adult education class dealing with digital photography. Learning how cameras work might seem to be below you, with full auto cameras, but that is where you should start. You wouldn’t attempt to star in a film if you hadn’t first taken an acting class, would you? You can pick up all of the digital “lingo” basics, a ton of new tips that you might not have ever learned, and all from a simple nights or weekend class. Spend time picking the instructors brain, and ask all of the questions that you might have. Get your moneys worth!
2) Set aside an hour or so each day and surf the web for digital shooting and digital software editing tutorials and podcasts. With what free time I can find I try to watch a lot of tutorials. Some of the best tutorials are only a minute or two in length, and they can be directed right into your ITunes account so that you never miss a trick. Here are some to get you started in the right direction.
3) Go to popular photographers’ sites and follow what they teach. If I wanted to learn about something I would ask a pro. Why risk getting bogus information? Here are some of the best sites that I have come across, when dealing with pro’s that share.
4) Purchasing a few simple items of gear and learning when and how to use them can pay off big time. Try out some items designed to make your photography experience easier and more enjoyable like using the correct tripods, filters, software, and lenses for whatever type of images you are shooting. If you can’t find the resources to splurge on expensive items that you feel you are not ready for, consulting the D.I.Y. sites listed below can help you get closer to your ideas!
Learning what certain gear does can improve your understanding of what is achievable. I often ask “How did they do that”, and later figure it out as I read about a new piece of gear that has been released. Anything is possible if you have the right gear, or is it tools?
5) Organizing your gear can save you both time and trouble in the long run. Look into finding the best (safest) camera bag for your shooting environment. Keep your camera bag clean by using a vacuum with a narrow attachment. This will keep dirt and scratches at bay.
Place your expensive memory cards all in one (safe) place using memory card wallets. Flipping the full cards with the label side facing in an opposite direction will quickly let you know which ones to use next. Always format your used memory cards before shooting with them again. Simply deleting the images is not good enough, and it is too time consuming.



 Before
 After
After Before
 After
After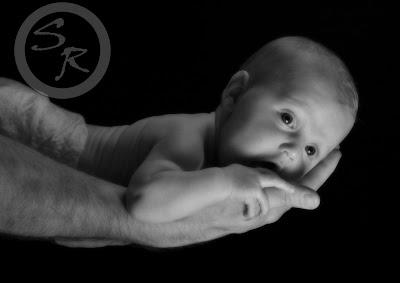








 For a great