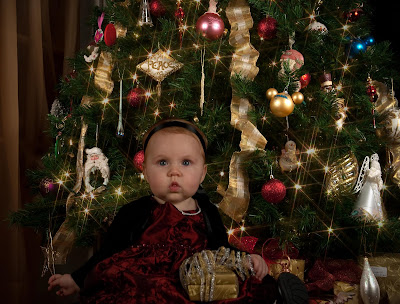
The concept for this creative shoot was thought out the night before I shot it. As I tried to fall asleep on a couch, with three miniature schnauzers, I thought my way through a challenging and creative image. All that I knew for sure was the fact that I was creating a warm “Christmas card” sort of image with a Christmas tree for most of the background, and the main focus being a young child.
I quickly thought about incorporating a star filter to the Christmas lights in order to create a warm holiday feeling. However, I did not want the star filter to add any distractions or effect to the rest of the image. I also wanted the beautiful decorations on the tree to be sharp and well exposed. Lastly, I needed the child to be well light and full of detail.
I then realized that I would need to take several different exposures, using different white balances throughout, and one exposure would be through a star filter. The lights on the tree would need an “incandescent” white balance (in camera), the rest would get a “flash” W.B. Setting. This is because I would be lighting both the tree's decorations and the child with two Nikon SB28's through umbrellas.
Just as I was about to drift off to sleep I realized that each image would need to be taken from the exact same angle and height. If the camera moved as I shot the images would not line up as I later edited through them. The star filtered image would need a longer exposure too, so a tripod would be employed for the session. I would need to “frame in” the image first, and then not move the camera at all as I took each image.
I also used a Nikon MC-30 remote shutter release just to make sure that the camera would not move at all.
Then I was ready to start taking pictures! First, I shot the Christmas lights-only, with the star filter, set at half a second at F/4, an ISO of 200, and W.B. set to “incandescent”. I turned off all of the other lights throughout the house, and then took the long exposure of just the Christmas tree lights. I didn't care if anything else was properly exposed in this image, since all I would be keeping is the star effect near each light.
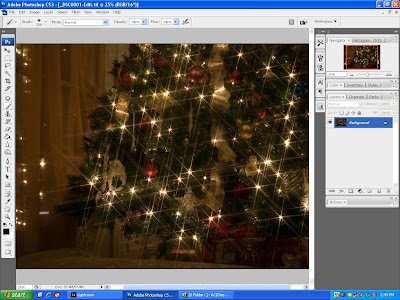 Long exposure, exposed for the lights using a star effect filter.
The second image that I took was of the tree itself, with all of the great decorations. I set up two Nikon SB28's, each diffused with white umbrellas, and each one at about a 45 degree angle from the center of the tree that was facing the camera. I turned off the Christmas tree lights and then took the shot. I shot with the white balance set on “flash”, and at1/60th at F/5 with the ISO set at 200.
 This image is exposed for the decorations only.
Next up came the images of the child in her red Christmas dress. I could take as many shots as I wanted, of the child, all with different poses, as long as the camera perspective did not move. I can't stress this point enough, and I will hit on this point at least one more time as I walk you through the editing.
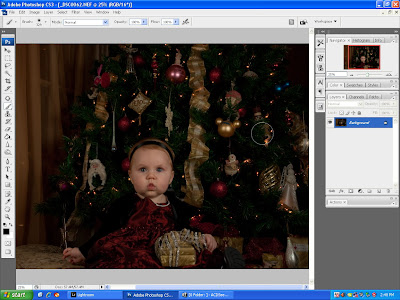 This image was exposed for the Child only, with two flashes.
Again, I used the two Nikon SB28's with umbrellas in order to light the baby. I used flash because I knew that she would not stay still at all. Again, the W.B. was set to “Flash”, and I shot at 1/60th at F/5, with the ISO set at 200. I did not care if anything else exposed, because all that I wanted was the girl exposed.
Once the images were taken it was time to edit them in Photoshop.
First of all I would like to take a second and explain one point. Each image was taken with its own correct white balance which was set “in camera”. However, since I would be comping several different images (of different white balances) into one final image, I will be adjusting each of these images white balance once more in Photoshop using the threshold feature. This is to make certain that the three images match up perfectly in color and then combine to form one great looking composite image.
The first image that I opened was the image that I took of the tree and its decorations. This will become my background image that I will drag and drop other images into. I then doubled the background layer, did a white balance correction using threshold and curves, and that was about it. I like to use the threshold function in order to find the true white and true black in an image, and then I use the dropper tool (in curves) to set them as such. Since this step is done with each image, I will only type “threshold adjustment” from here on out.
Next, I opened the image of the lights through the star filter. I went through the threshold procedure, and then it was time to layer it on the first image. I need these two images to lay exactly on top of each other, so I held down the shift key as I dragged the star filter image onto the background tree image. A new layer opens automatically, with the star filter image on it.
With the new layer active, I created a layer mask and “painted out” everything except the lighting effect over the tree. Layer masks work with painting black and white colors. White “paints in” on the image, and black removes, or “paints out” on the image. Setting the brush and opacity determines how much is removed or placed back; on a layer mask.
I decided to set the layer blend mode of the layer mask layer to lighten in order to allow only the lighter parts to remain on top, and to allow the darker parts of the background image to show through. I also lowered the opacity of the layer mask layer just a little in order to make the effect a little more believable.
 Back Ground image after two tree images get merged togather.
Now, if it looks great, flatten the image and save it. Now you can open this image each time, and then do the same thing with each child pose image. Let me explain what I mean.......
In my mind I hoped to get the tree image and star lights image combined, save it, and then simply add each of the different child poses onto this combined, flattened image. I took a lot of child poses, so I shad a lot of work to do.
Painting with layer masks is the fastest way that I know to do this. Forget a natural cut and paste. Cutting around hair is almost impossible to do, and it just looks like a cut and paste job. Besides, what is easier than painting?
Each time I open up and start to edit a new Christmas card image, I first open up the custom background image. Then I open the “pose image” that I will drag and drop onto the custom background. I perform the threshold white balance task on the “pose image” and then drag and drop the “pose image” (holding down the shift tab) into the custom background image. Once more, it will automatically create a new layer for the dropped layer, and this will be made into a layer mask.
“Paint out” all of the image, except for the child, on the new layer mask layer. As for a tip, you can make the layer mask only visible by turning off the background layer. This will show you any of the image that you might have missed. The reverse will show what is behind the pose layer in order to determine what should show through, and what should not.

Layer mask, with the child layer only active.
All that is left is for you to flatten and then save your new composite image. It is just this easy!
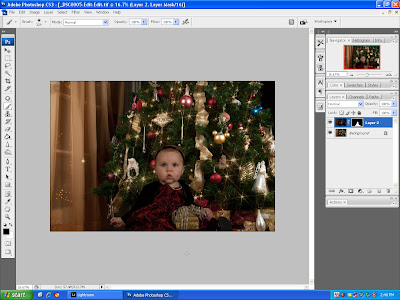 Final Composite image, made from three exposures for lighting.
 Playing with the different layer blending types, as you experiment with your own composite images, will prove to be a ton of fun. Don't be scared to try new things as you work, as that is how we all learn!
Pleas take a second and subscribe to the A.T.A.P. Blog right now. You sure don't want to miss out on all of the great information that I like to pass on. Your comments are also always welcome. Thanks for stopping by, and I hope to see you again soon!

 Follow this link over to his awesome site to see some more of his amazing work. Great job!